Canon PowerShot A2200 User Manual - Page 29
Shooting or Viewing Images in Easy Mode - instructions
 |
View all Canon PowerShot A2200 manuals
Add to My Manuals
Save this manual to your list of manuals |
Page 29 highlights
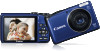
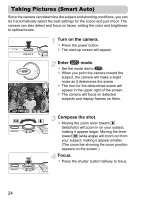
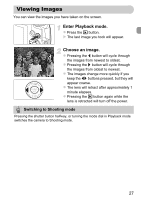
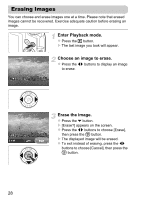
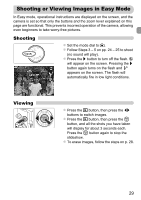
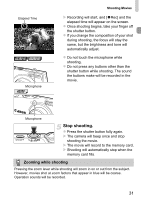
Shooting or Viewing Images in Easy Mode In Easy mode, operational instructions are displayed on the screen, and the camera is set so that only the buttons and the zoom lever explained on this page are functional. This prevents incorrect operation of the camera, allowing even beginners to take worry-free pictures. Shooting z Set the mode dial to 9. z Follow Steps 3 - 5 on pp. 24 - 25 to shoot (no sound will play). z Press the r button to turn off the flash. ! will appear on the screen. Pressing the r button again turns on the flash and appears on the screen. The flash will automatically fire in low light conditions. Viewing z Press the 1 button, then press the qr buttons to switch images. z Press the 1 button, then press the m button, and all the shots you have taken will display for about 3 seconds each. Press the m button again to stop the slideshow. z To erase images, follow the steps on p. 28. 29
-
 1
1 -
2
-
3
-
4
-
5
-
6
-
7
-
8
-
9
-
10
-
11
-
12
-
13
-
14
-
15
-
16
-
17
-
18
-
19
-
20
-
21
-
22
-
23
-
 24
24 -
 25
25 -
 26
26 -
 27
27 -
 28
28 -
 29
29 -
 30
30 -
 31
31 -
 32
32 -
 33
33 -
 34
34 -
35
-
36
-
37
-
38
-
39
-
40
-
41
-
42
-
43
-
44
-
45
-
46
-
47
-
48
-
49
-
50
-
51
-
52
-
53
-
54
-
55
-
56
-
57
-
58
-
59
-
60
-
61
-
62
-
63
-
64
-
65
-
66
-
67
-
68
-
69
-
70
-
71
-
72
-
73
-
74
-
75
-
76
-
77
-
78
-
79
-
80
-
81
-
82
-
83
-
84
-
85
-
86
-
87
-
88
-
89
-
90
-
91
-
92
-
93
-
94
-
95
-
96
-
97
-
98
-
99
-
100
-
101
-
102
-
103
-
104
-
105
-
106
-
107
-
108
-
109
-
110
-
111
-
112
-
113
-
114
-
115
-
116
-
117
-
118
-
119
-
120
-
121
-
122
-
123
-
124
-
125
-
126
-
127
-
128
-
129
-
130
-
131
-
132
-
133
-
134
-
135
-
136
-
137
-
138
-
139
-
140
-
141
-
142
-
143
-
144
-
145
-
146
-
147
-
148
-
149
-
150
-
151
-
152
-
153
-
154
-
155
-
156
-
157
-
158
-
159
-
160
-
161
-
162
-
163
-
164
-
165
-
166
-
167
-
168
-
169
-
170
-
171
-
172
-
173
-
174
-
175
-
176
-
177
-
178
-
179
-
180
-
181
-
182
-
183
-
184
-
185
-
186
-
187
-
188
-
189
-
190
-
191
-
192
-
193
-
194
-
195
-
196
-
197
-
198
-
199
-
200
-
201
-
202
-
203
-
204
 |
 |
