Canon PowerShot G15 User Guide - Page 240
Turn the TV on and switch to, video input., Turn the camera on., TV before disconnecting the cable.
 |
View all Canon PowerShot G15 manuals
Add to My Manuals
Save this manual to your list of manuals |
Page 240 highlights
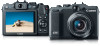
Using Optional Accessories 3 Turn the TV on and switch to video input. zzSwitch the TV input to the video input you connected the cable to in step 2. 4 Turn the camera on. zzPress the button to turn the camera on. XXImages from the camera are now displayed on the TV. (Nothing is displayed on the camera screen.) zzWhen finished, turn off the camera and TV before disconnecting the cable. • It is not possible to connect the USB cable or an optional stereo AV cable at the same time as an HDMI Cable HTC‑100. Forcing the cables into the camera at the same time may damage the camera or cables. • Camera operating sounds are not played while the camera is connected to an HDTV. 240
-
 1
1 -
2
-
3
-
4
-
5
-
6
-
7
-
8
-
9
-
10
-
11
-
12
-
13
-
14
-
15
-
16
-
17
-
18
-
19
-
20
-
21
-
22
-
23
-
24
-
25
-
26
-
27
-
28
-
29
-
30
-
31
-
32
-
33
-
34
-
35
-
36
-
37
-
38
-
39
-
40
-
41
-
42
-
43
-
44
-
45
-
46
-
47
-
48
-
49
-
50
-
51
-
52
-
53
-
54
-
55
-
56
-
57
-
58
-
59
-
60
-
61
-
62
-
63
-
64
-
65
-
66
-
67
-
68
-
69
-
70
-
71
-
72
-
73
-
74
-
75
-
76
-
77
-
78
-
79
-
80
-
81
-
82
-
83
-
84
-
85
-
86
-
87
-
88
-
89
-
90
-
91
-
92
-
93
-
94
-
95
-
96
-
97
-
98
-
99
-
100
-
101
-
102
-
103
-
104
-
105
-
106
-
107
-
108
-
109
-
110
-
111
-
112
-
113
-
114
-
115
-
116
-
117
-
118
-
119
-
120
-
121
-
122
-
123
-
124
-
125
-
126
-
127
-
128
-
129
-
130
-
131
-
132
-
133
-
134
-
135
-
136
-
137
-
138
-
139
-
140
-
141
-
142
-
143
-
144
-
145
-
146
-
147
-
148
-
149
-
150
-
151
-
152
-
153
-
154
-
155
-
156
-
157
-
158
-
159
-
160
-
161
-
162
-
163
-
164
-
165
-
166
-
167
-
168
-
169
-
170
-
171
-
172
-
173
-
174
-
175
-
176
-
177
-
178
-
179
-
180
-
181
-
182
-
183
-
184
-
185
-
186
-
187
-
188
-
189
-
190
-
191
-
192
-
193
-
194
-
195
-
196
-
197
-
198
-
199
-
200
-
201
-
202
-
203
-
204
-
205
-
206
-
207
-
208
-
209
-
210
-
211
-
212
-
213
-
214
-
215
-
216
-
217
-
218
-
219
-
220
-
221
-
222
-
223
-
224
-
225
-
226
-
227
-
228
-
229
-
230
-
231
-
232
-
233
-
234
-
 235
235 -
 236
236 -
 237
237 -
 238
238 -
 239
239 -
 240
240 -
 241
241 -
 242
242 -
 243
243 -
 244
244 -
 245
245 -
246
-
247
-
248
-
249
-
250
-
251
-
252
-
253
-
254
-
255
-
256
-
257
-
258
-
259
-
260
-
261
-
262
-
263
-
264
-
265
-
266
-
267
-
268
-
269
-
270
-
271
-
272
-
273
-
274
-
275
-
276
-
277
-
278
-
279
-
280
-
281
-
282
-
283
-
284
-
285
-
286
-
287
-
288
-
289
-
290
-
291
-
292
-
293
-
294
-
295
-
296
-
297
-
298
-
299
-
300
-
301
-
302
-
303
-
304
-
305
-
306
-
307
-
308
-
309
-
310
-
311
-
312
-
313
-
314
 |
 |
240
Using Optional Accessories
3
Turn the TV on and switch to
video input.
z
Switch the TV input to the video input you
connected the cable to in step 2.
4
Turn the camera on.
z
Press the <
1
> button to turn the camera
on.
X
Images from the camera are now
displayed on the TV. (Nothing is
displayed on the camera screen.)
z
When finished, turn off the camera and
TV before disconnecting the cable.
•
It is not possible to connect the USB cable or an optional stereo
AV cable at the same time as an HDMI Cable HTC‑100. Forcing
the cables into the camera at the same time may damage the
camera or cables.
•
Camera operating sounds are not played while the camera is connected to
an HDTV.