Canon Powershot S2 IS PowerShot S2 IS Camera User Guide - Page 146
Select images for printing., Press the MENU button.
 |
UPC - 490561006106
View all Canon Powershot S2 IS manuals
Add to My Manuals
Save this manual to your list of manuals |
Page 146 highlights
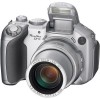
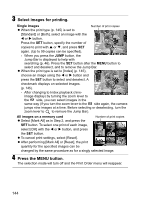
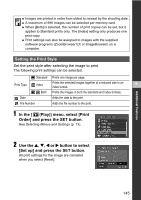
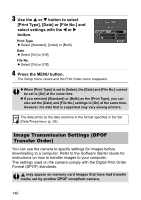
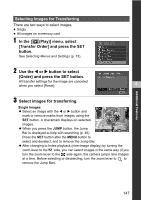
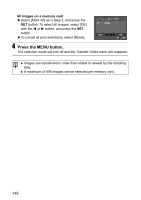
3 Select images for printing. Single Images Number of print copies z When the print type (p. 145) is set to [Standard] or [Both], select an image with the W or X button. Press the SET button, specify the number of copies to print with S or T, and press SET again. (Up to 99 copies can be specified). - When you press the JUMP button, the Jump Bar is displayed to help with searching (p. 46). Press the SET button after the MENU button to select and deselect, and to remove the Jump Bar. z When the print type is set to [Index] (p. 145), choose an image using the W or X button and press the SET button to select and deselect. A checkmark displays on selected images. (p. 145). - After changing to Index playback (nine- image display) by turning the zoom lever to the side, you can select images in the same way (if you turn the zoom lever to the side again, the camera jumps nine images at a time. Before selecting or deselecting, turn the zoom lever to to remove the Jump Bar). All images on a memory card Number of print copies z Select [Mark All] as in Step 2, and press the SET button. To select one print of each image, select [OK] with the W or X button, and press the SET button. z To cancel print settings, select [Reset]. z After performing [Mark All] or [Reset], the print quantity for the specified images can be changed by the same procedure as for a singly selected image. 4 Press the MENU button. The selection mode will turn off and the Print Order menu will reappear. 144
-
 1
1 -
2
-
3
-
4
-
5
-
6
-
7
-
8
-
9
-
10
-
11
-
12
-
13
-
14
-
15
-
16
-
17
-
18
-
19
-
20
-
21
-
22
-
23
-
24
-
25
-
26
-
27
-
28
-
29
-
30
-
31
-
32
-
33
-
34
-
35
-
36
-
37
-
38
-
39
-
40
-
41
-
42
-
43
-
44
-
45
-
46
-
47
-
48
-
49
-
50
-
51
-
52
-
53
-
54
-
55
-
56
-
57
-
58
-
59
-
60
-
61
-
62
-
63
-
64
-
65
-
66
-
67
-
68
-
69
-
70
-
71
-
72
-
73
-
74
-
75
-
76
-
77
-
78
-
79
-
80
-
81
-
82
-
83
-
84
-
85
-
86
-
87
-
88
-
89
-
90
-
91
-
92
-
93
-
94
-
95
-
96
-
97
-
98
-
99
-
100
-
101
-
102
-
103
-
104
-
105
-
106
-
107
-
108
-
109
-
110
-
111
-
112
-
113
-
114
-
115
-
116
-
117
-
118
-
119
-
120
-
121
-
122
-
123
-
124
-
125
-
126
-
127
-
128
-
129
-
130
-
131
-
132
-
133
-
134
-
135
-
136
-
137
-
138
-
139
-
140
-
 141
141 -
 142
142 -
 143
143 -
 144
144 -
 145
145 -
 146
146 -
 147
147 -
 148
148 -
 149
149 -
 150
150 -
 151
151 -
152
-
153
-
154
-
155
-
156
-
157
-
158
-
159
-
160
-
161
-
162
-
163
-
164
-
165
-
166
-
167
-
168
-
169
-
170
-
171
-
172
-
173
-
174
-
175
-
176
-
177
-
178
-
179
-
180
-
181
-
182
-
183
-
184
-
185
-
186
-
187
 |
 |