Canon Powershot S2 IS PowerShot S2 IS Camera User Guide - Page 23
Use the, button on the, omni selector to select [OK], then, press the SET button., Press the MENU - problem
 |
UPC - 490561006106
View all Canon Powershot S2 IS manuals
Add to My Manuals
Save this manual to your list of manuals |
Page 23 highlights
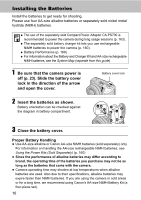
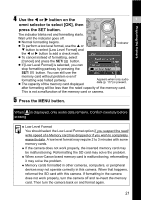
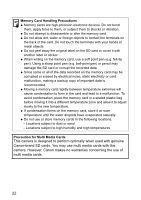
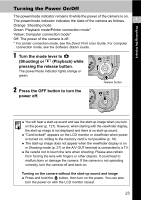
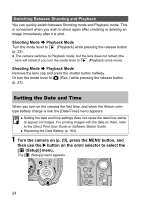
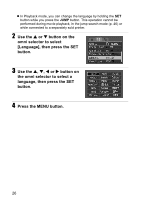
Preparing the Camera 4 Use the W or X button on the 1 omni selector to select [OK], then press the SET button. The indicator blinks red and formatting starts. Wait until the indicator goes off. z Normal formatting begins. z To perform a low level format, use the S or Indicator T button to select [Low Level Format] and the W or X button to add a check mark. z To cancel instead of formatting, select [Cancel] and press the SET/ button. z If [Low Level Format] is selected, you can stop formatting partway by pressing the SET/ button. You can still use the memory card without problem even if formatting was halted partway. z The capacity of the memory card displayed Appears when only audio data (p. 117) is present. after formatting will be less than the rated capacity of the memory card. This is not a malfunction of the memory card or camera. 5 Press the MENU button. When is displayed, only audio data remains. Confirm carefully before erasing. ‹ Low Level Format You should select the Low Level Format option if you suspect the read/ write speed of a Memory card has dropped or if you wish to completely erase its data. A low level format may require 2 to 3 minutes with some memory cards. ‹ If the camera does not work properly, the inserted memory card may be malfunctioning. Reformatting the SD card may solve the problem. ‹ When a non-Canon brand memory card is malfunctioning, reformatting it may solve the problem. ‹ Memory cards formatted in other cameras, computers, or peripheral devices may not operate correctly in this camera. When that happens, reformat the SD card with this camera. If formatting in the camera does not work properly, turn the camera off and re-insert the memory card. Then turn the camera back on and format again. 21
-
 1
1 -
2
-
3
-
4
-
5
-
6
-
7
-
8
-
9
-
10
-
11
-
12
-
13
-
14
-
15
-
16
-
17
-
 18
18 -
 19
19 -
 20
20 -
 21
21 -
 22
22 -
 23
23 -
 24
24 -
 25
25 -
 26
26 -
 27
27 -
 28
28 -
29
-
30
-
31
-
32
-
33
-
34
-
35
-
36
-
37
-
38
-
39
-
40
-
41
-
42
-
43
-
44
-
45
-
46
-
47
-
48
-
49
-
50
-
51
-
52
-
53
-
54
-
55
-
56
-
57
-
58
-
59
-
60
-
61
-
62
-
63
-
64
-
65
-
66
-
67
-
68
-
69
-
70
-
71
-
72
-
73
-
74
-
75
-
76
-
77
-
78
-
79
-
80
-
81
-
82
-
83
-
84
-
85
-
86
-
87
-
88
-
89
-
90
-
91
-
92
-
93
-
94
-
95
-
96
-
97
-
98
-
99
-
100
-
101
-
102
-
103
-
104
-
105
-
106
-
107
-
108
-
109
-
110
-
111
-
112
-
113
-
114
-
115
-
116
-
117
-
118
-
119
-
120
-
121
-
122
-
123
-
124
-
125
-
126
-
127
-
128
-
129
-
130
-
131
-
132
-
133
-
134
-
135
-
136
-
137
-
138
-
139
-
140
-
141
-
142
-
143
-
144
-
145
-
146
-
147
-
148
-
149
-
150
-
151
-
152
-
153
-
154
-
155
-
156
-
157
-
158
-
159
-
160
-
161
-
162
-
163
-
164
-
165
-
166
-
167
-
168
-
169
-
170
-
171
-
172
-
173
-
174
-
175
-
176
-
177
-
178
-
179
-
180
-
181
-
182
-
183
-
184
-
185
-
186
-
187
 |
 |