Canon RC-IP100 Remote Camera Controller User Manual - Page 15
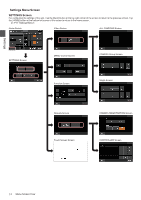
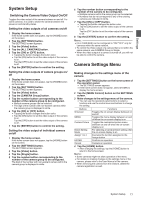
System Setup, Switching the Camera Video Output On/Off, Camera Settings Menu
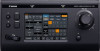 |
View all Canon RC-IP100 manuals
Add to My Manuals
Save this manual to your list of manuals |
Page 15 highlights
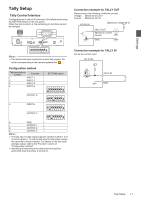
Settings System Setup Switching the Camera Video Output On/Off Toggles the video output of the camera between on and off. For some cameras, it is used to switch the camera between the power-on and standby states. Setting the video outputs of all cameras on/off 1 Display the home screen. If the home screen does not appear, tap the [HOME] button on the screen. 2 Tap the [SETTINGS] button. The SETTINGS screen appears. 3 Tap the [Video] button. 4 Tap the [ALL CAMERAS] button. 5 Tap the [ON] or [OFF] button. 0 Tapping the button changes the button color. 0 Tap the [ON] button to set the video output of the camera to on. Tap the [OFF] button to set the video output of the camera to off. 6 Tap the [ENTER] button to confirm the setting. Setting the video outputs of camera groups on/ off 1 Display the home screen. If the home screen does not appear, tap the [HOME] button on the screen. 2 Tap the [SETTINGS] button. The SETTINGS screen appears. 3 Tap the [Video] button. 4 Tap the [CAMERA Group] button. 5 Tap the number button corresponding to the number of the camera group to be configured. 0 Multiple camera groups can be selected. 0 The digit of the number with non-existent camera within the camera group is displayed in white. 6 Tap the [ON] or [OFF] button. 0 Tapping the button changes the button color. 0 Tap the [ON] button to set the video output of the camera to on. Tap the [OFF] button to set the video output of the camera to off. 7 Tap the [ENTER] button to confirm the setting. Setting the video output of individual camera on/off 1 Display the home screen. If the home screen does not appear, tap the [HOME] button on the screen. 2 Tap the [SETTINGS] button. The SETTINGS screen appears. 3 Tap the [Video] button. 4 Tap the [Single] button. 5 Tap the number button corresponding to the number of the camera group to be configured. The digit of the number with non-existent camera within the camera group is displayed in white. 6 Tap the number button corresponding to the number of the camera to be configured. 0 Multiple cameras within the same group can be selected. 0 Numbers that do not correspond to any of the existing cameras are indicated in white. 7 Tap the [ON] or [OFF] button. 0 Tapping the button changes the button color. 0 Tap the [ON] button to set the video output of the camera to on. Tap the [OFF] button to set the video output of the camera to off. 8 Tap the [ENTER] button to confirm the setting. Memo : 0 [ALL CAMERAS] can be configured to "ON"/"OFF" only for cameras within the same network. 0 To control the Video output of a camera that is not within the same network, use CAMERA Group or Single. 0 When the video output of a camera is turned off, you will not be able to control the camera. Camera Settings Menu Making changes to the settings menu of the camera 1 Tap the [SETTINGS] button on the home screen of the operation panel. 0 The SETTINGS screen appears. 0 If the home screen does not appear, select [HOME] to display the home screen. 2 Tap the [MENU Control] button on the SETTINGS screen. 3 Make changes to the settings menu of the camera. 0 You can use the operation panel buttons to select a function and use the control lever and buttons to change the setting. Buttons Onscreen MENU Custom Picture Direct Setting Mode Assign 1 to 4 ENTER Cancel Functions Toggles the on-screen display between on and off Toggles the menu display between on and off when the on-screen display is on Toggles the customized picture menu between on and off when the on-screen display is on For selecting a Camera Direct setting when the on-screen display is on Executes the function assigned to the Assign button Confirms an operation Cancels an operation 4 Tap the [HOME] button. 0 After changing the settings, tap the [HOME] button to return to the home screen. Memo : 0 Some cameras might not allow operation of the menu. 0 For details on making changes to the settings menu of the camera, please refer to the User Manual of the camera. 0 When removing the camera from the network, delete the camera registration as well. System Setup 15
-
 1
1 -
2
-
3
-
4
-
5
-
6
-
7
-
8
-
9
-
 10
10 -
 11
11 -
 12
12 -
 13
13 -
 14
14 -
 15
15 -
 16
16 -
 17
17 -
 18
18 -
 19
19 -
 20
20 -
21
 |
 |
