Canon RC-IP100 Remote Camera Controller User Manual - Page 16
Network Settings, Camera Network Settings, Network Settings on This Controller
 |
View all Canon RC-IP100 manuals
Add to My Manuals
Save this manual to your list of manuals |
Page 16 highlights
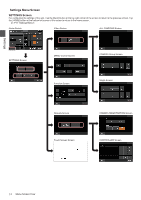
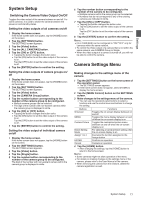
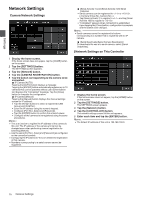
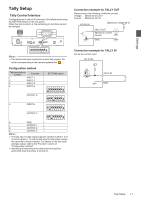
Settings Network Settings Camera Network Settings . 1 Display the home screen. If the home screen does not appear, tap the [HOME] button on the screen. 2 Tap the [SETTINGS] button. The SETTINGS screen appears. 3 Tap the [Network] button. 4 Tap the [CAMERA REGISTRATION] button. 5 Tap the button corresponding to the camera to be connected. o IP Camera [AUTO] Tapping the [AUTO] button displays a message. Tapping the [ENTER] button automatically registers up to 10 cameras that can be operated without user authentication and displays the "Completed" message. Tap the [Close] button to complete the configuration. o IP Camera [Manual] Tapping the [Manual] button displays the manual settings screen for IP address. 0 Tap the left/right buttons to select a registered [CAM Group] and [CAM No.]. 0 Enter the IP address using the numeric keypad. 0 Configure [Port No.], [User] and [Password]. 0 Tap the [ENTER] button to confirm the entered values. 0 Configure all the cameras to be registered using the same procedures. Memo : 0 This is a function to register the IP address of the camera to this unit. The IP address of the camera unit cannot be changed even when performing manual registration by selecting [Manual]. 0 Use the same [Port No.], [User] and [Password] as configured on the connected camera. 0 Configuring the IP address to "0.0.0.0" deletes the registration of that camera. 0 Numbers corresponding to a serial camera cannot be registered. o [Serial Activate 1] and [Serial Activate 100] Serial Cameras 0 Serial cameras can be registered to or . () 0 Tap [Serial Activate 1] to register to and tap [Serial Activate 100] to register to . 0 "Completed" appears when connection is established. Upon tapping the [Close] button, configuration is complete and the button color changes. Memo : 0 Serial cameras cannot be registered to buttons corresponding to a number that is registered with an IP camera. o [Serial Deactivate] Serial Camera Deactivation To deactivate the use of a serial camera, select [Serial Deactivate]. Network Settings on This Controller . 1 Display the home screen. If the home screen does not appear, tap the [HOME] button on the screen. 2 Tap the [SETTINGS] button. The SETTINGS screen appears. 3 Tap the [Network] button. 4 Tap the [CONTROLLER] button. The network settings screen of this unit appears. 5 Enter each item and tap the [ENTER] button. Memo : 0 The default IP address of this unit is 192.168.100.0. 16 Network Settings
-
 1
1 -
2
-
3
-
4
-
5
-
6
-
7
-
8
-
9
-
10
-
 11
11 -
 12
12 -
 13
13 -
 14
14 -
 15
15 -
 16
16 -
 17
17 -
 18
18 -
 19
19 -
 20
20 -
 21
21
 |
 |
