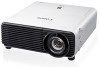
Canon REALiS WUX500 Pro AV MULTIMEDIA PROJECTOR WUX500 Users Manual - Page 122
Mac OS X, Resetting the IP Address Setting of the Computer
 |
View all Canon REALiS WUX500 Pro AV manuals
Add to My Manuals
Save this manual to your list of manuals |
Page 122 highlights
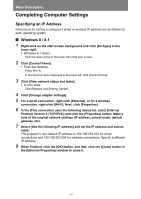
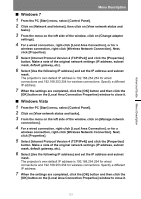
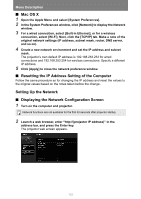
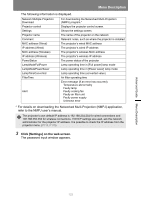
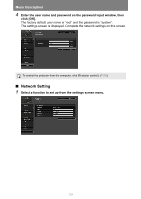
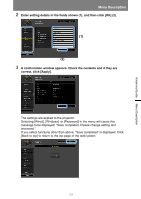
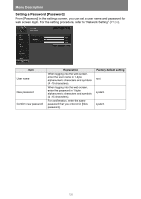
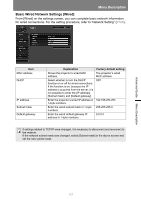
Menu Description ■ Mac OS X 1 Open the Apple Menu and select [System Preferences]. 2 In the System Preferences window, click [Network] to display the Network window. 3 For a wired connection, select [Built-in Ethernet], or for a wireless connection, select [Wi-Fi]. Next, click the [TCP/IP] tab. Make a note of the original network settings (IP address, subnet mask, router, DNS server, and so on). 4 Create a new network environment and set the IP address and subnet mask. The projector's own default IP address is 192.168.254.254 for wired connections and 192.168.253.254 for wireless connections. Specify a different IP address. 5 Click [Apply] to close the network preference window. ■ Resetting the IP Address Setting of the Computer Follow the same procedure as for changing the IP address and reset the values to the original values based on the notes taken before the change. Setting Up the Network ■ Displaying the Network Configuration Screen 1 Turn on the computer and projector. Network functions are not available for the first 40 seconds after projector startup. 2 Launch a web browser, enter "http://(projector IP address)" in the address bar, and press the Enter key. The projector web screen appears. 122
-
 1
1 -
2
-
3
-
4
-
5
-
6
-
7
-
8
-
9
-
10
-
11
-
12
-
13
-
14
-
15
-
16
-
17
-
18
-
19
-
20
-
21
-
22
-
23
-
24
-
25
-
26
-
27
-
28
-
29
-
30
-
31
-
32
-
33
-
34
-
35
-
36
-
37
-
38
-
39
-
40
-
41
-
42
-
43
-
44
-
45
-
46
-
47
-
48
-
49
-
50
-
51
-
52
-
53
-
54
-
55
-
56
-
57
-
58
-
59
-
60
-
61
-
62
-
63
-
64
-
65
-
66
-
67
-
68
-
69
-
70
-
71
-
72
-
73
-
74
-
75
-
76
-
77
-
78
-
79
-
80
-
81
-
82
-
83
-
84
-
85
-
86
-
87
-
88
-
89
-
90
-
91
-
92
-
93
-
94
-
95
-
96
-
97
-
98
-
99
-
100
-
101
-
102
-
103
-
104
-
105
-
106
-
107
-
108
-
109
-
110
-
111
-
112
-
113
-
114
-
115
-
116
-
 117
117 -
 118
118 -
 119
119 -
 120
120 -
 121
121 -
 122
122 -
 123
123 -
 124
124 -
 125
125 -
 126
126 -
 127
127 -
128
-
129
-
130
-
131
-
132
-
133
-
134
-
135
-
136
-
137
-
138
-
139
-
140
-
141
-
142
-
143
-
144
-
145
-
146
-
147
-
148
-
149
-
150
-
151
-
152
-
153
-
154
-
155
-
156
-
157
-
158
-
159
-
160
-
161
-
162
-
163
-
164
-
165
-
166
-
167
-
168
-
169
-
170
-
171
-
172
-
173
-
174
-
175
-
176
-
177
-
178
-
179
-
180
-
181
-
182
-
183
-
184
-
185
-
186
-
187
-
188
-
189
-
190
 |
 |
