Canon S200 PowerShot S200, Digital IXUS V2 Camera User Guide - Page 103
Setting the Printing Area
 |
UPC - 013803013511
View all Canon S200 manuals
Add to My Manuals
Save this manual to your list of manuals |
Page 103 highlights
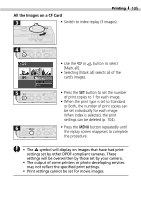
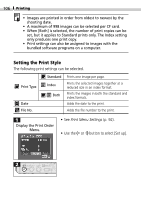
Printing 101 • Press the button to finish the procedure. • Practically all of the image area is printed on Bordered prints. • With borderless or multiple prints, the center portion of the image (as shown in the LCD monitor) is slightly enlarged to fill the space. Consequently, the top, bottom and sides of the image may be cropped slightly. • The date settings are overridden by the DPOF print settings if you are using them to print (p. 106). • If you are using a camera-direct printer, the date and borders settings cannot be selected when the Multiple option is selected. (Images are printed without a date or border.) Setting the Printing Area You can select between the following three options to set the printing area for an image. Top Prints the upper portion of the image. Center Prints the center portion of the image. Bottom Prints the lower portion of the image. • Set the print style (image, borders, date, etc.) before setting the printing area (p. 99). • The printing area can be set when the [Borderless] and [Multiple] options have been selected. • The printing area may shift right or left if the paper size is set to L or the image setting in the print style is set to Multiple.
-
 1
1 -
2
-
3
-
4
-
5
-
6
-
7
-
8
-
9
-
10
-
11
-
12
-
13
-
14
-
15
-
16
-
17
-
18
-
19
-
20
-
21
-
22
-
23
-
24
-
25
-
26
-
27
-
28
-
29
-
30
-
31
-
32
-
33
-
34
-
35
-
36
-
37
-
38
-
39
-
40
-
41
-
42
-
43
-
44
-
45
-
46
-
47
-
48
-
49
-
50
-
51
-
52
-
53
-
54
-
55
-
56
-
57
-
58
-
59
-
60
-
61
-
62
-
63
-
64
-
65
-
66
-
67
-
68
-
69
-
70
-
71
-
72
-
73
-
74
-
75
-
76
-
77
-
78
-
79
-
80
-
81
-
82
-
83
-
84
-
85
-
86
-
87
-
88
-
89
-
90
-
91
-
92
-
93
-
94
-
95
-
96
-
97
-
 98
98 -
 99
99 -
 100
100 -
 101
101 -
 102
102 -
 103
103 -
 104
104 -
 105
105 -
 106
106 -
 107
107 -
 108
108 -
109
-
110
-
111
-
112
-
113
-
114
-
115
-
116
-
117
-
118
-
119
-
120
-
121
-
122
-
123
-
124
-
125
-
126
-
127
-
128
-
129
-
130
-
131
-
132
-
133
-
134
-
135
-
136
-
137
-
138
-
139
-
140
-
141
-
142
-
143
-
144
-
145
-
146
-
147
 |
 |
