Canon S800 Setup instructions for the S800 printer - Page 4
Step 4: Install the Ink Tanks
 |
View all Canon S800 manuals
Add to My Manuals
Save this manual to your list of manuals |
Page 4 highlights
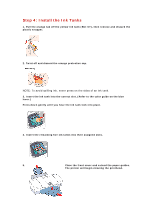
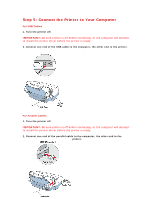
Step 4: Install the Ink Tanks 1. Pull the orange tab off the yellow ink tank (BCI-6Y), then remove and discard the plastic wrapper. 2. Twist off and discard the orange protective cap. NOTE: To avoid spilling ink, never press on the sides of an ink tank. 3. Insert the ink tank into the correct slot. (Refer to the color guide on the blue lever.) Press down gently until you hear the ink tank lock into place. 4. Insert the remaining five ink tanks into their assigned slots. 5. Close the front cover and extend the paper guides. The printer will begin cleaning the printhead.
-
 1
1 -
 2
2 -
 3
3 -
 4
4 -
 5
5 -
 6
6 -
 7
7 -
 8
8 -
 9
9 -
 10
10
 |
 |

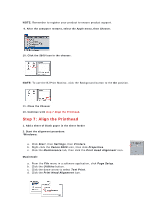
Step 4: Install the Ink Tanks
1. Pull the orange tab off the yellow ink tank (BCI-6Y), then remove and discard the
plastic wrapper.
2. Twist off and discard the orange protective cap.
NOTE: To avoid spilling ink, never press on the sides of an ink tank.
3. Insert the ink tank into the correct slot. (Refer to the color guide on the blue
lever.)
Press down gently until you hear the ink tank lock into place.
4. Insert the remaining five ink tanks into their assigned slots.
5.
Close the front cover and extend the paper guides.
The printer will begin cleaning the printhead.