Canon SD790IS PowerShot SD790 IS / DIGITAL IXUS 90 IS Camera User Guide - Page 7
Index, Functions Available in Each Shooting Mode - camera
 |
UPC - 012345332609
View all Canon SD790IS manuals
Add to My Manuals
Save this manual to your list of manuals |
Page 7 highlights
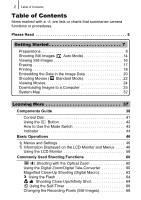
Table of Contents 5 Index 216 Functions Available in Each Shooting Mode 222 About this Guide „ Symbol Conventions in this Guide 66 Using the Self-Timer Available Shooting Modes p. 222 You can set the time delay and the numbers of shots you wish to take in advance. 10 sec. Self-Timer: shoots 10 seconds after you press the shutter button. • 2 seconds before the shutter releases, the self-timer lamp and sound speed up. 2 sec. Self-Timer: shoots 2 seconds after you press the shutter button. • At the same time as the shutter button is pressed, the self-timer sound beeps rapidly*, the self-timer lamp blinks, and the shutter releases 2 seconds later. Custom Timer: you can change the delay time (0-10, 15, 20, 30 sec.) and number of shots (1-10). • When [Delay] is set to 2 or more seconds, the self-timer sound beeps quickly 2 seconds before the shutter releases*. When [Shots] is set to more than 1, the self-timer sound only beeps before the first shot. * This may differ depending on your My Camera settings (p. 177). 1 Press the button. 1. Use the or button to change the Self-timer mode. • Pressing the MENU button while this screen is displayed will allow you to set the delay and number of shots as when Custom Timer is selected Mode switch position Modes • Shooting Movies ( ) • Special Scene ( ) • Shooting Still Images ( ) • Playback ( ) Some functions may not be available in certain shooting modes. If there is no notation to that effect, the function may be used in all modes. : This mark denotes issues that may affect the camera's operation. : This mark denotes additional topics that complement the basic operating procedures. Explanations in this guide are based on the camera's default settings at time of purchase. Specifications are subject to change without prior notice. As a result, the illustrations and screenshots used in this guide may differ from the actual camera.
-
 1
1 -
 2
2 -
 3
3 -
 4
4 -
 5
5 -
 6
6 -
 7
7 -
 8
8 -
 9
9 -
 10
10 -
 11
11 -
 12
12 -
13
-
14
-
15
-
16
-
17
-
18
-
19
-
20
-
21
-
22
-
23
-
24
-
25
-
26
-
27
-
28
-
29
-
30
-
31
-
32
-
33
-
34
-
35
-
36
-
37
-
38
-
39
-
40
-
41
-
42
-
43
-
44
-
45
-
46
-
47
-
48
-
49
-
50
-
51
-
52
-
53
-
54
-
55
-
56
-
57
-
58
-
59
-
60
-
61
-
62
-
63
-
64
-
65
-
66
-
67
-
68
-
69
-
70
-
71
-
72
-
73
-
74
-
75
-
76
-
77
-
78
-
79
-
80
-
81
-
82
-
83
-
84
-
85
-
86
-
87
-
88
-
89
-
90
-
91
-
92
-
93
-
94
-
95
-
96
-
97
-
98
-
99
-
100
-
101
-
102
-
103
-
104
-
105
-
106
-
107
-
108
-
109
-
110
-
111
-
112
-
113
-
114
-
115
-
116
-
117
-
118
-
119
-
120
-
121
-
122
-
123
-
124
-
125
-
126
-
127
-
128
-
129
-
130
-
131
-
132
-
133
-
134
-
135
-
136
-
137
-
138
-
139
-
140
-
141
-
142
-
143
-
144
-
145
-
146
-
147
-
148
-
149
-
150
-
151
-
152
-
153
-
154
-
155
-
156
-
157
-
158
-
159
-
160
-
161
-
162
-
163
-
164
-
165
-
166
-
167
-
168
-
169
-
170
-
171
-
172
-
173
-
174
-
175
-
176
-
177
-
178
-
179
-
180
-
181
-
182
-
183
-
184
-
185
-
186
-
187
-
188
-
189
-
190
-
191
-
192
-
193
-
194
-
195
-
196
-
197
-
198
-
199
-
200
-
201
-
202
-
203
-
204
-
205
-
206
-
207
-
208
-
209
-
210
-
211
-
212
-
213
-
214
-
215
-
216
-
217
-
218
-
219
-
220
-
221
-
222
-
223
-
224
-
225
-
226
-
227
 |
 |
