Canon SELPHY CP760 SELPHY CP760 Printing Guide - Page 11
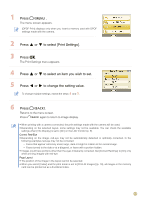
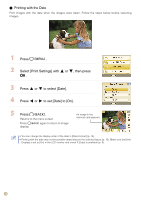
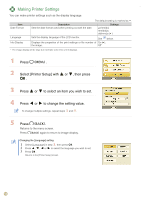
Press, to select [Print Settings]., to select an item you wish to set., to change the setting value.
 |
View all Canon SELPHY CP760 manuals
Add to My Manuals
Save this manual to your list of manuals |
Page 11 highlights
Press . The menu screen appears. [DPOF Print] displays only when you insert a memory card with DPOF settings made with the camera. Press or to select [Print Settings]. Press . The Print Settings menu appears. Press or to select an item you wish to set. Press or to change the setting value. To change multiple settings, repeat the steps and . Press . Returns to the menu screen. Press again to return to image display. • When printing with a camera connected, the print settings made with the camera will be used. • Depending on the selected layout, some settings may not be available. You can check the available settings when [Info Display] is set to [On] on the LCD monitor (p. 9). Correct Red-Eye • Depending on the image, red-eye may not be automatically detected or optimally corrected. In the following examples red-eye may not be corrected. − Faces that appear extremely small, large, dark or bright in relation to the overall image. − Faces turned to the side or at a diagonal, or faces with a portion hidden. • Images could have portions other than the eyes mistakenly corrected. Set [Correct Red-Eye] to [On] only when printing images with red-eye. Page Layout • The position of the image in the layout cannot be selected. • When you select [Index] and the print mode is set to [Print All Images] (p. 13), all images in the memory card can be printed out as a thumbnail index. 11
-
 1
1 -
2
-
3
-
4
-
5
-
 6
6 -
 7
7 -
 8
8 -
 9
9 -
 10
10 -
 11
11 -
 12
12 -
 13
13 -
 14
14 -
 15
15 -
 16
16 -
17
-
18
-
19
-
20
-
21
-
22
-
23
-
24
-
25
-
26
-
27
-
28
-
29
-
30
-
31
-
32
 |
 |
