Canon SELPHY CP760 SELPHY CP760 Printing Guide - Page 15
Printing from Digital Cameras, Mobile Phones or Computers - supplies
 |
View all Canon SELPHY CP760 manuals
Add to My Manuals
Save this manual to your list of manuals |
Page 15 highlights
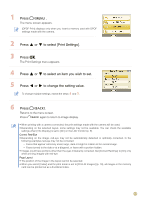
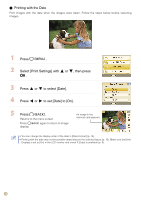
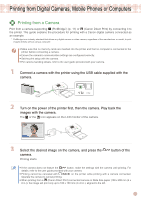
Printing from Digital Cameras, Mobile Phones or Computers Printing from a Camera Print from a camera supporting (PictBridge*) (p. 11) or (Canon Direct Print) by connecting it to the printer. This guide explains the procedure for printing with a Canon digital camera connected as an example. * PictBridge is an industry standard that allows any digital camera or video camera, regardless of the manufacturer or model, to print images directly without using a computer. • Make sure that no memory cards are inserted into the printer and that no computer is connected to the printer before connecting a camera. • Ensure the camera's communication settings are configured correctly. • Set the print setup with the camera. • For camera handling details, refer to the user guide provided with your camera. Connect a camera with the printer using the USB cable supplied with the camera. Turn on the power of the printer first, then the camera. Play back the images with the camera. The or the icon appears on the LCD monitor of the camera. Select the desired image on the camera, and press the camera. Printing starts. button of the • If the camera does not feature the button, make the settings with the camera until printing. For details, refer to the user guide provided with your camera. • Printing cannot be canceled with Operate the camera to cancel printing. on the printer while printing with a camera connected. • When printing from a (Canon Direct Print) connected camera on Wide Size paper (100 x 200 mm (4 x 8 in.)), the image will print only up to 100 x 150 mm (4 x 6 in.), aligned to the left. 15
-
 1
1 -
2
-
3
-
4
-
5
-
6
-
7
-
8
-
9
-
 10
10 -
 11
11 -
 12
12 -
 13
13 -
 14
14 -
 15
15 -
 16
16 -
 17
17 -
 18
18 -
 19
19 -
 20
20 -
21
-
22
-
23
-
24
-
25
-
26
-
27
-
28
-
29
-
30
-
31
-
32
 |
 |