Canon SELPHY CP760 SELPHY CP760 Printing Guide - Page 18
Windows - driver
 |
View all Canon SELPHY CP760 manuals
Add to My Manuals
Save this manual to your list of manuals |
Page 18 highlights
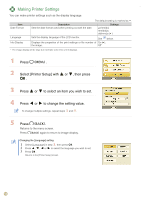
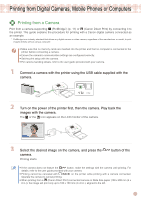
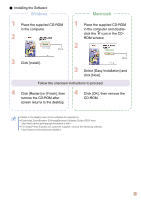
Installing the Printer Driver • Do not connect the computer to the printer before placing the CD-ROM in the computer. • You must login to the computer as an administrator before beginning installation. The instructions in this section are intended for Windows XP and Mac OS X (v10.4). If you are using another version, actual screen contents and procedures may differ slightly from those indicated here. Windows Macintosh Place the supplied CD-ROM in the computer. Click Place the supplied CD-ROM in the computer and doubleclick the icon in the CDROM window. Click Click to select your printer name. Click [Yes], if you consent to the software license agreement. Connect the computer to the printer, and turn the printer's power on. Commercially available USB cable Click [Finish]. Click [Agree], if you consent to the software license agreement. Click to select [Easy Install], then click [Install]. Restart your computer. Connect the computer to the printer (see the figure left), and turn the printer's power on. Register your printer on the Printer List in the [Printer Setup Utility]. 18
-
 1
1 -
2
-
3
-
4
-
5
-
6
-
7
-
8
-
9
-
10
-
11
-
12
-
 13
13 -
 14
14 -
 15
15 -
 16
16 -
 17
17 -
 18
18 -
 19
19 -
 20
20 -
 21
21 -
 22
22 -
 23
23 -
24
-
25
-
26
-
27
-
28
-
29
-
30
-
31
-
32
 |
 |