Canon SELPHY ES1 SELPHY ES1 User Guide - Page 54
Installing the Printer Driver and the Software - driver windows 7
 |
UPC - 013803065541
View all Canon SELPHY ES1 manuals
Add to My Manuals
Save this manual to your list of manuals |
Page 54 highlights
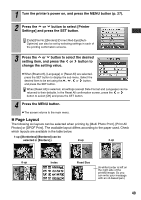
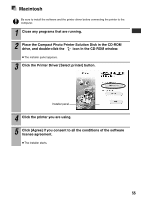
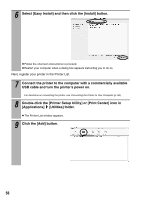
Installing the Printer Driver and the Software The Compact Photo Printer Solution Disk contains software that your computer will require for printing. Install the printer driver and the software according to the following steps. The instructions in this section are intended for Windows XP and Mac OS X (v10.3). If you are using another version of OS, actual screen contents and procedures may differ slightly from those indicated here. Windows z Be sure to install the software and the printer driver before connecting the printer to the computer. z Be sure to log on with Administrator privileges (computer system administrator) when installing the software. 1 Close any programs that are running. 2 Place the Compact Photo Printer Solution Disk in the CD-ROM drive. z How to display the installer panel If the installer panel does not automatically appear, use the following procedure to display it. 1. Click the [start] button and select [My Computer]. For Windows 2000, double-click the [My Computer] icon on the desktop. 2. Right-click the CD-ROM icon and select [Open]. 3. Double-click the SETUP.EXE* icon ( ). *The ".EXE" extension may not display depending on the computer used. Install the printer driver to your computer. 3 Click the Printer Driver [Select printer] button. Installer panel 4 Click the printer you are using. 52
-
 1
1 -
2
-
3
-
4
-
5
-
6
-
7
-
8
-
9
-
10
-
11
-
12
-
13
-
14
-
15
-
16
-
17
-
18
-
19
-
20
-
21
-
22
-
23
-
24
-
25
-
26
-
27
-
28
-
29
-
30
-
31
-
32
-
33
-
34
-
35
-
36
-
37
-
38
-
39
-
40
-
41
-
42
-
43
-
44
-
45
-
46
-
47
-
48
-
 49
49 -
 50
50 -
 51
51 -
 52
52 -
 53
53 -
 54
54 -
 55
55 -
 56
56 -
 57
57 -
 58
58 -
 59
59 -
60
-
61
-
62
-
63
-
64
-
65
-
66
-
67
-
68
-
69
-
70
-
71
-
72
-
73
-
74
-
75
-
76
-
77
 |
 |
