Canon SX20 PowerShot SX20 IS Camera User Guide - Page 27
Viewing Images
 |
UPC - 628586116580
View all Canon SX20 manuals
Add to My Manuals
Save this manual to your list of manuals |
Page 27 highlights
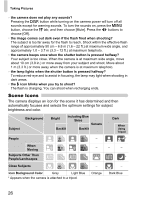
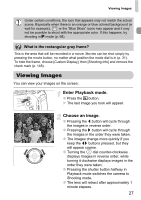
Viewing Images Under certain conditions, the icon that appears may not match the actual scene. Especially when there is an orange or blue colored background (a wall for example), or the "Blue Skies" icons may appear and it may not be possible to shoot with the appropriate color. If this happens, try shooting in G mode (p. 68). What is the rectangular gray frame? This is the area that will be recorded in a movie. Movies can be shot simply by pressing the movie button, no matter what position the mode dial is in (p. 31). To hide the frame, choose [Custom Display], then [Shooting Info] and remove the check mark (p. 148). Viewing Images You can view your images on the screen. Enter Playback mode. ● Press the 1 button. X The last image you took will appear. Choose an image. ● Pressing the q button will cycle through the images in reverse order. ● Pressing the r button will cycle through the images in the order they were taken. ● The images change more quickly if you keep the qr buttons pressed, but they will appear coarse. ● Turning the  dial counter-clockwise displays images in reverse order, while turning it clockwise displays images in the order they were taken. ● Pressing the shutter button halfway in Playback mode switches the camera to Shooting mode. ● The lens will retract after approximately 1 minute elapses. 27
-
 1
1 -
2
-
3
-
4
-
5
-
6
-
7
-
8
-
9
-
10
-
11
-
12
-
13
-
14
-
15
-
16
-
17
-
18
-
19
-
20
-
21
-
 22
22 -
 23
23 -
 24
24 -
 25
25 -
 26
26 -
 27
27 -
 28
28 -
 29
29 -
 30
30 -
 31
31 -
 32
32 -
33
-
34
-
35
-
36
-
37
-
38
-
39
-
40
-
41
-
42
-
43
-
44
-
45
-
46
-
47
-
48
-
49
-
50
-
51
-
52
-
53
-
54
-
55
-
56
-
57
-
58
-
59
-
60
-
61
-
62
-
63
-
64
-
65
-
66
-
67
-
68
-
69
-
70
-
71
-
72
-
73
-
74
-
75
-
76
-
77
-
78
-
79
-
80
-
81
-
82
-
83
-
84
-
85
-
86
-
87
-
88
-
89
-
90
-
91
-
92
-
93
-
94
-
95
-
96
-
97
-
98
-
99
-
100
-
101
-
102
-
103
-
104
-
105
-
106
-
107
-
108
-
109
-
110
-
111
-
112
-
113
-
114
-
115
-
116
-
117
-
118
-
119
-
120
-
121
-
122
-
123
-
124
-
125
-
126
-
127
-
128
-
129
-
130
-
131
-
132
-
133
-
134
-
135
-
136
-
137
-
138
-
139
-
140
-
141
-
142
-
143
-
144
-
145
-
146
-
147
-
148
-
149
-
150
-
151
-
152
-
153
-
154
-
155
-
156
-
157
-
158
-
159
-
160
-
161
-
162
-
163
-
164
-
165
-
166
-
167
-
168
-
169
-
170
-
171
-
172
-
173
-
174
-
175
-
176
-
177
-
178
-
179
-
180
 |
 |
