Canon VB-S31D Mark II Network Camera Operation Guide - Page 128
[Camera] > [Panorama] Creating a Panorama Image, Creating a Panorama Image
 |
View all Canon VB-S31D Mark II manuals
Add to My Manuals
Save this manual to your list of manuals |
Page 128 highlights
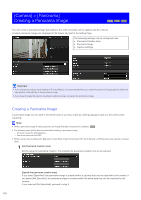
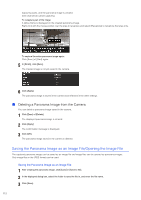
[Camera] > [Panorama] Creating a Panorama Image HM4x S30 S31 You can create a panorama image that captures the entire area that can be captured by the camera. Created panorama images are displayed in the Viewer and part of the Setting Page. The following settings can be configured here. • Panorama Creation Area • Panorama Image • Capture Settings Important • If you change the privacy mask settings in [Privacy Mask], it is recommended that you create the panorama image again to reflect the new privacy mask settings in the panorama image. • If you have changed the camera installation method settings, recapture the panorama image. Creating a Panorama Image A panorama image can be used in the Viewer and for a privacy mask by clicking [Apply] to save it to the camera after capturing. Note • While a panorama image is being captured, the Image Stabilizer is temporarily disabled. HM4x • The following users will be disconnected while creating a panorama image. - All users except for administrators - Users not connected via RTP • When a small value is entered for [Maximum Frame Rate: Video Transmission] (P. 92) in [Video] > [JPEG], panorama capture is slowed down. 1 Set [Panorama Creation Area]. Set the range for panorama creation. This enables the panorama creation time to be reduced. [Specify the panorama creation area] If you select [Specified], the panorama image is created within a set area that can be captured by the camera. If you select [Not Specified], the panorama image is created within the entire area that can be captured by the camera. If you selected [Not Specified], proceed to step 3. 110
-
 1
1 -
2
-
3
-
4
-
5
-
6
-
7
-
8
-
9
-
10
-
11
-
12
-
13
-
14
-
15
-
16
-
17
-
18
-
19
-
20
-
21
-
22
-
23
-
24
-
25
-
26
-
27
-
28
-
29
-
30
-
31
-
32
-
33
-
34
-
35
-
36
-
37
-
38
-
39
-
40
-
41
-
42
-
43
-
44
-
45
-
46
-
47
-
48
-
49
-
50
-
51
-
52
-
53
-
54
-
55
-
56
-
57
-
58
-
59
-
60
-
61
-
62
-
63
-
64
-
65
-
66
-
67
-
68
-
69
-
70
-
71
-
72
-
73
-
74
-
75
-
76
-
77
-
78
-
79
-
80
-
81
-
82
-
83
-
84
-
85
-
86
-
87
-
88
-
89
-
90
-
91
-
92
-
93
-
94
-
95
-
96
-
97
-
98
-
99
-
100
-
101
-
102
-
103
-
104
-
105
-
106
-
107
-
108
-
109
-
110
-
111
-
112
-
113
-
114
-
115
-
116
-
117
-
118
-
119
-
120
-
121
-
122
-
 123
123 -
 124
124 -
 125
125 -
 126
126 -
 127
127 -
 128
128 -
 129
129 -
 130
130 -
 131
131 -
 132
132 -
 133
133 -
134
-
135
-
136
-
137
-
138
-
139
-
140
-
141
-
142
-
143
-
144
-
145
-
146
-
147
-
148
-
149
-
150
-
151
-
152
-
153
-
154
-
155
-
156
-
157
-
158
-
159
-
160
-
161
-
162
-
163
-
164
-
165
-
166
-
167
-
168
-
169
-
170
-
171
-
172
-
173
-
174
-
175
-
176
-
177
-
178
-
179
-
180
-
181
-
182
-
183
-
184
-
185
-
186
-
187
-
188
-
189
-
190
-
191
-
192
-
193
-
194
-
195
-
196
-
197
-
198
-
199
-
200
-
201
-
202
-
203
-
204
-
205
-
206
-
207
-
208
-
209
-
210
-
211
-
212
-
213
-
214
-
215
-
216
-
217
-
218
-
219
-
220
-
221
-
222
-
223
-
224
-
225
-
226
-
227
-
228
-
229
-
230
-
231
-
232
-
233
-
234
-
235
-
236
-
237
-
238
-
239
-
240
-
241
-
242
-
243
-
244
-
245
-
246
-
247
-
248
-
249
-
250
-
251
-
252
-
253
-
254
-
255
-
256
-
257
-
258
-
259
-
260
 |
 |