Canon VIXIA HF M41 VIXIA HF M40 / HF M41 / HF M400 Instruction Manual - Page 46
AUTO Mode - flash memory camcorder test
 |
View all Canon VIXIA HF M41 manuals
Add to My Manuals
Save this manual to your list of manuals |
Page 46 highlights
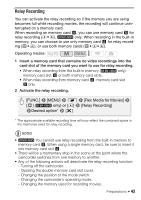
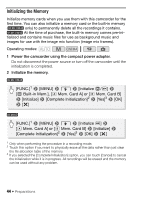
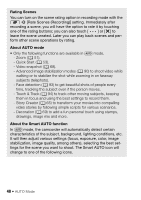
AUTO Mode This chapter covers how to easily record video and photos in mode, and how to use basic shooting functions like zoom and Quick Start. To enjoy full access to menus and more advanced functions, refer to Recording in y (Manual) Mode (0 84). Basic Recording Shooting Video and Taking Photos in AUTO Mode By default, movies and photos are recorded in the built-in memory ( only) or on memory card X ( ). You can select the memory that will be used to record movies and photos (0 42). Please read the IMPORTANT section (0 49) before using an Eye-Fi card. Operating modes: POINTS TO CHECK • Before you begin recording, make a test recording first to check that the camcorder is operating correctly. 1 Set the mode switch to . 2 Turn on the camcorder. To record video Press g to begin recording. • Press g again to pause the recording. • The ACCESS indicator will flash from time to time while the scene is being recorded. j 46 Š AUTO Mode
-
 1
1 -
2
-
3
-
4
-
5
-
6
-
7
-
8
-
9
-
10
-
11
-
12
-
13
-
14
-
15
-
16
-
17
-
18
-
19
-
20
-
21
-
22
-
23
-
24
-
25
-
26
-
27
-
28
-
29
-
30
-
31
-
32
-
33
-
34
-
35
-
36
-
37
-
38
-
39
-
40
-
 41
41 -
 42
42 -
 43
43 -
 44
44 -
 45
45 -
 46
46 -
 47
47 -
 48
48 -
 49
49 -
 50
50 -
 51
51 -
52
-
53
-
54
-
55
-
56
-
57
-
58
-
59
-
60
-
61
-
62
-
63
-
64
-
65
-
66
-
67
-
68
-
69
-
70
-
71
-
72
-
73
-
74
-
75
-
76
-
77
-
78
-
79
-
80
-
81
-
82
-
83
-
84
-
85
-
86
-
87
-
88
-
89
-
90
-
91
-
92
-
93
-
94
-
95
-
96
-
97
-
98
-
99
-
100
-
101
-
102
-
103
-
104
-
105
-
106
-
107
-
108
-
109
-
110
-
111
-
112
-
113
-
114
-
115
-
116
-
117
-
118
-
119
-
120
-
121
-
122
-
123
-
124
-
125
-
126
-
127
-
128
-
129
-
130
-
131
-
132
-
133
-
134
-
135
-
136
-
137
-
138
-
139
-
140
-
141
-
142
-
143
-
144
-
145
-
146
-
147
-
148
-
149
-
150
-
151
-
152
-
153
-
154
-
155
-
156
-
157
-
158
-
159
-
160
-
161
-
162
-
163
-
164
-
165
-
166
-
167
-
168
-
169
-
170
-
171
-
172
-
173
-
174
-
175
-
176
-
177
-
178
-
179
-
180
-
181
-
182
-
183
-
184
-
185
-
186
-
187
-
188
-
189
-
190
-
191
-
192
-
193
-
194
-
195
-
196
-
197
-
198
-
199
-
200
-
201
-
202
-
203
-
204
 |
 |
