Canon Z155 Instruction Manual - Page 35
p''Fp
 |
UPC - 750845806113
View all Canon Z155 manuals
Add to My Manuals
Save this manual to your list of manuals |
Page 35 highlights
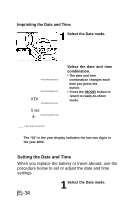
Imprinting the Date and Time etc. Setting the Date ' I ' BO ¿ZdO WrrOTiON Setting the Time p''Fp K/ 5. Csi} Set the date and time. © Press the ItMl button for more than 2 seconds for date/time set mode. ® Press the [«a button to select the setting position (numbers blinking). Setting position cycles through in the order year-month-dayhour-minute-(:). ® Press the button to set. ® Repeat @ and ® above to set all digits of the date and time. Pressing the button while is blinking resets the seconds (:) setting to zero. ® Press the button and o n c e s t o p s blinking, date and time setting is completed. Press the IMODEI button to return to ready-to-shoot mode. Q] • Each time you replace the battery, the date display on the LCD panel reverts to When this occurs, set the date and time. • Each time the button is pressed, the number increases by one. If kept pressed, the number increases continuously. o Use only film with DX-code. If you use film without DXcode, it may not be possible to imprint the date and time or caption on the final shots. lE-35
-
 1
1 -
2
-
3
-
4
-
5
-
6
-
7
-
8
-
9
-
10
-
11
-
12
-
13
-
14
-
15
-
16
-
17
-
18
-
19
-
20
-
21
-
22
-
23
-
24
-
25
-
26
-
27
-
28
-
29
-
 30
30 -
 31
31 -
 32
32 -
 33
33 -
 34
34 -
 35
35 -
 36
36 -
 37
37 -
 38
38 -
 39
39 -
 40
40 -
41
-
42
-
43
 |
 |