Canon i560 Series i560 Quick Start Guide - Page 55
An Error Message Appears on the Screen
 |
View all Canon i560 Series manuals
Add to My Manuals
Save this manual to your list of manuals |
Page 55 highlights
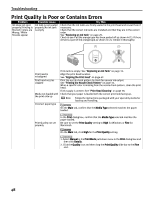
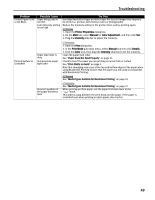
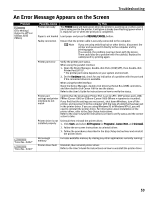
Troubleshooting An Error Message Appears on the Screen Problem Error Writing / Output to LPT1 or USBxxx (USB PRNnn) "Error No.: X202" "Error No.: X203" Possible Cause Printer not ready Try This The POWER lamp will flash green when the printer is warming up or when a print job is being sent to the printer. It will glow a steady (non-flashing) green when it is ready for use or when the print job is completed. Paper is not loaded Load paper and press the RESUME/CANCEL button. Faulty connection Ensure that the printer cable is securely connected to the computer. Note If you are using switching hub or other device, disconnect the printer and reconnect it directly to the computer and try printing again. If successful, the problem may have been with the device. There could also be a problem with the cable(s). Replace the cable(s) and try printing again. Printer port error Verify the printer port status. When using the parallel interface 1. Open the Device Manager, double-click Ports (COM/LPT), then double-click Printer Port (LPT1)*. * The printer port name depends on your system environment. 2. On the Hardware tab, check for any indication of a problem with the port and if the connected device is available. When using the USB interface Open the Device Manager, double-click Universal Serial Bus (USB) controllers, and then double-click Canon i560 to see the status. Refer to the User's Guide for instructions on how to verify the status. Printer port settings and printer interface do not match Confirm that the destination Printer Port is set to LPT1: (ECP printer port), USB PRNnn (Canon i560) or USBnnn (Canon i560) (Where n represents a number). If you find that the settings are not correct, shut down Windows, turn off the printer, and reconnect it to the computer with the type of cable that has been set in the printer driver. If you are using Windows 95 or Windows NT4.0, you will need to reinstall the printer driver. For information about installation of the printer driver, refer to the Easy Setup Instructions. Refer to the User's Guide for instructions on how to verify status and the correct action to take. Printer driver is not installed properly Uninstall then reinstall the printer driver. 1. Click Start, and select All Programs (or Programs), Canon i560, and Uninstall. 2. Follow the on-screen instructions to uninstall driver. 3. Follow the procedures described in the Easy Setup Instructions and reinstall the printer driver. Not enough memory Increase available memory by closing any other applications currently running. Printer driver fault Uninstall, then reinstall printer driver. Refer to the User's Guide for instructions on how to uninstall the printer driver. 53
-
 1
1 -
2
-
3
-
4
-
5
-
6
-
7
-
8
-
9
-
10
-
11
-
12
-
13
-
14
-
15
-
16
-
17
-
18
-
19
-
20
-
21
-
22
-
23
-
24
-
25
-
26
-
27
-
28
-
29
-
30
-
31
-
32
-
33
-
34
-
35
-
36
-
37
-
38
-
39
-
40
-
41
-
42
-
43
-
44
-
45
-
46
-
47
-
48
-
49
-
 50
50 -
 51
51 -
 52
52 -
 53
53 -
 54
54 -
 55
55 -
 56
56 -
 57
57 -
 58
58 -
 59
59 -
 60
60 -
61
-
62
-
63
-
64
-
65
-
66
-
67
-
68
 |
 |