Canon i900D i900D Direct Printing Guide - Page 40
Print Head Cleaning - print head replacement
 |
View all Canon i900D manuals
Add to My Manuals
Save this manual to your list of manuals |
Page 40 highlights
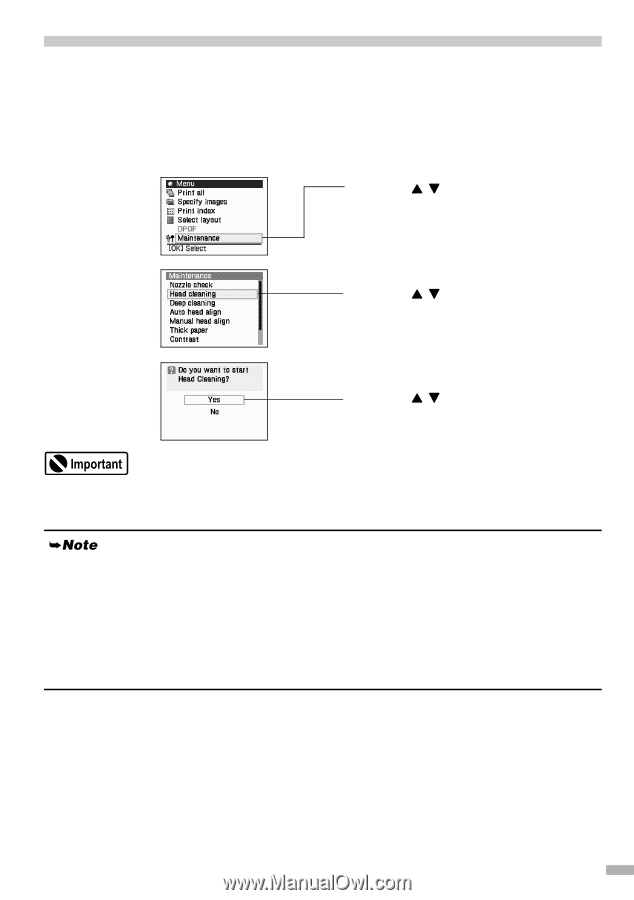
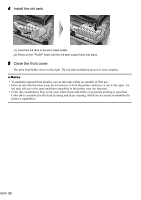
Print Head Cleaning Clean the print head if you suspect that the nozzles might be clogged. Cleaning the print head consumes ink, so perform print head cleaning only when necessary. 1 Ensure that the printer is on. 2 Print Head Cleaning. (1) Press the Menu button. (2) Use the buttons to select Maintenance and then press the OK button. The maintenance menu is displayed. (3) Use the buttons to select Head cleaning and then press the OK button. The confirmation screen is displayed. (4) Use the buttons to select Yes and then press the OK button. Do not perform any other operations until the print head cleaning finishes. This takes about 50 seconds. After print head cleaning finishes After print head cleaning finishes, print the nozzle check pattern to verify that the print head nozzles are clean. See "Printing the Nozzle Check Pattern" on page 38. When ink is low, the nozzle check pattern is not printed correctly. See "Replacing Ink Tanks" on page 35. If the print quality remains poor, repeat head cleaning 3 times. If the print quality still remains poor, perform head refreshing. See "Print Head Deep Cleaning" on page 40. 39
-
 1
1 -
2
-
3
-
4
-
5
-
6
-
7
-
8
-
9
-
10
-
11
-
12
-
13
-
14
-
15
-
16
-
17
-
18
-
19
-
20
-
21
-
22
-
23
-
24
-
25
-
26
-
27
-
28
-
29
-
30
-
31
-
32
-
33
-
34
-
 35
35 -
 36
36 -
 37
37 -
 38
38 -
 39
39 -
 40
40 -
 41
41 -
 42
42 -
 43
43 -
 44
44 -
 45
45 -
46
-
47
-
48
 |
 |