Canon i900D i900D Direct Printing Guide - Page 42
Aligning Print Head - Auto head align - print head error
 |
View all Canon i900D manuals
Add to My Manuals
Save this manual to your list of manuals |
Page 42 highlights
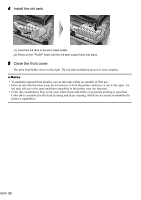
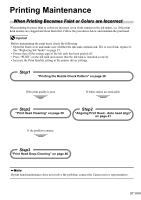
Aligning Print Head - Auto head align Aligning the print head position allows you to print without shifts in the color registration. There are two ways to align the print head, automatic or manual. First, try adjusting the print head automatically. If the automatic print head aligning does not work or if you wish, you can adjust the print head manually. See "Adjusting the Print Head Manually" on page 43. 1 With the printer on, load a sheet of A4 paper in the printer. 2 Align the print head automatically. (1) Press the Menu button. (2) Use the buttons to select Maintenance and then press the OK button. The maintenance menu is displayed. (3) Use the buttons to select Auto head align and then press the OK button. The confirmation screen is displayed. (4) Use the buttons to select Yes and then press the OK button. A pattern is printed and the print head is automatically aligned. When Automatic Print Head Aligning Cannot Execute Correctly When automatic print head aligning cannot execute correctly, the power lamp flashes orange 11 times and the message "Failed to align print head" is displayed on the LCD. Please follow the procedure below. (1) Press the Resume button to clear the error. (2) Open the front cover and check if there is ink left. If there is no ink left, replace the ink tanks. See "Replacing Ink Tanks" on page 35. (3) Print the nozzle check pattern to verify that the print nozzles are clean. See "Printing the Nozzle Check Pattern" on page 38. (4) Move the printer so that the paper output is not in direct sunlight and try automatic print head aligning again. (5) If the error persists, adjust the print head manually. See "Adjusting the Print Head Manually" on page 43. 41
-
 1
1 -
2
-
3
-
4
-
5
-
6
-
7
-
8
-
9
-
10
-
11
-
12
-
13
-
14
-
15
-
16
-
17
-
18
-
19
-
20
-
21
-
22
-
23
-
24
-
25
-
26
-
27
-
28
-
29
-
30
-
31
-
32
-
33
-
34
-
35
-
36
-
 37
37 -
 38
38 -
 39
39 -
 40
40 -
 41
41 -
 42
42 -
 43
43 -
 44
44 -
 45
45 -
 46
46 -
 47
47 -
48
 |
 |
