Canon iP90 iP90 Quick Start Guide - Page 9
Loading Plain Paper - support
 |
UPC - 013803039276
View all Canon iP90 manuals
Add to My Manuals
Save this manual to your list of manuals |
Page 9 highlights
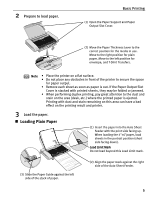
2 Prepare to load paper. Basic Printing (1) Open the Paper Support and Paper Output Slot Cover. (2) Move the Paper Thickness Lever to the correct position for the media in use. Move to the right position for plain paper. Move to the left position for envelope, and T-Shirt Transfers. Note • Place the printer on a flat surface. • Do not place any obstacles in front of the printer to secure the space for paper output. • Remove each sheet as soon as paper is out. If the Paper Output Slot Cover is stacked with printed sheets, they may be folded or jammed. • When performing duplex printing, pay great attention to the dust and stain on the area (desk, etc.) where the printed paper is ejected. Printing with dust and stain remaining on this area can have a bad effect on the printing result and printer. 3 Load the paper. „ Loading Plain Paper (1) Insert the paper into the Auto Sheet Feeder with the print side facing up. When loading the 4"×6"paper, load sheets in the portrait position (short side facing down). Load Limit Mark Do not load beyond this Load Limit mark. (3) Slide the Paper Guide against the left side of the stack of paper. (2) Align the paper stack against the right side of the Auto Sheet Feeder. 5
-
 1
1 -
2
-
3
-
 4
4 -
 5
5 -
 6
6 -
 7
7 -
 8
8 -
 9
9 -
 10
10 -
 11
11 -
 12
12 -
 13
13 -
 14
14 -
15
-
16
-
17
-
18
-
19
-
20
-
21
-
22
-
23
-
24
-
25
-
26
-
27
-
28
-
29
-
30
-
31
-
32
-
33
-
34
-
35
-
36
-
37
-
38
-
39
-
40
-
41
-
42
-
43
-
44
-
45
-
46
-
47
-
48
-
49
-
50
-
51
-
52
-
53
-
54
-
55
-
56
-
57
-
58
-
59
-
60
-
61
-
62
-
63
-
64
-
65
-
66
-
67
-
68
-
69
-
70
-
71
-
72
-
73
-
74
-
75
-
76
-
77
-
78
-
79
-
80
-
81
-
82
-
83
-
84
-
85
-
86
-
87
-
88
-
89
-
90
-
91
-
92
-
93
-
94
-
95
-
96
-
97
-
98
-
99
-
100
-
101
-
102
-
103
-
104
-
105
-
106
-
107
-
108
 |
 |
