Canon imageCLASS D680 imageCLASS D680 Set-Up Instructions
Canon imageCLASS D680 Manual
 |
View all Canon imageCLASS D680 manuals
Add to My Manuals
Save this manual to your list of manuals |
Canon imageCLASS D680 manual content summary:
- Canon imageCLASS D680 | imageCLASS D680 Set-Up Instructions - Page 1
MACHINE Machine Output Tray REMOVE ALL ITEMS FROM THE BOX • POWER CORD • TELEPHONE LINE* • DOCUMENTATION (Set-up Instructions, Reference Guide, Fax Guide*, Limited Warranty Card, Registration Card) • DESTINATION LABEL* • CD-ROM L50 Cartridge Pub. NO. FA7-3911-010 Printed in Thailand *D680 Model - Canon imageCLASS D680 | imageCLASS D680 Set-Up Instructions - Page 2
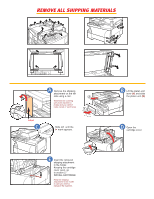
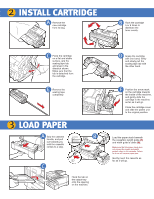
unit of the machine is locked and you cannot make copies or send faxes. 2 11 Slide left until the |< mark appears. E Insert the removed shipping attachment in the holder. Keeping the cartridge cover open, go to section 2 INSTALL CARTRIDGE Keep the shipping attachment in the holder in case you - Canon imageCLASS D680 | imageCLASS D680 Set-Up Instructions - Page 3
the cartridge cover and slide the platen unit to the original position. Load the paper stack beneath the cassette's length guide (1) and width guide's claws (2). Make sure that the paper stack does not exceed the length and width guide's claws in the cassette. Failure to do so will cause a paper jam - Canon imageCLASS D680 | imageCLASS D680 Set-Up Instructions - Page 4
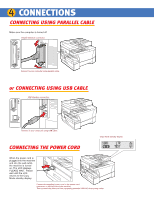
the machine is turned on. The LCD displays PLEASE WAIT. Please wait until the LCD returns to the Copy Mode standby display. Connect the supplied power cord to the power cCcooornndnnececocttnotnrheoecnstouthrpeopllneieftdthsepidoleewfeot rfstcidhoeerdmotfaotchthheinemep.aocwheirneco. rd Then connect - Canon imageCLASS D680 | imageCLASS D680 Set-Up Instructions - Page 5
RECEIVE MODE (D680) Press FAX to switch the machine to Fax Mode. Press RECEIVE MODE until the mode you want appears: ex. RECEIVE MODE Manual You can telephone to the machine, and enable the INCOMING RING setting. (---> Fax Guide) • For AnsMode, you need to connect an answering machine or a - Canon imageCLASS D680 | imageCLASS D680 Set-Up Instructions - Page 6
is connected to, COM: or FILE: port, the machine will not print. H Click HAVE DISK... in the MANUFACTURERS/ PRINTERS dialog box. The Install From Disk dialog box appears. J Driver file selection dialog appears. Click NEXT. Printer port selection dialog box appears. L Click FINISH. If you wish to - Canon imageCLASS D680 | imageCLASS D680 Set-Up Instructions - Page 7
using parallel cable. C Turn on the computer. Start up Windows XP. PLUG and PLAY is being carried out and the FOUND NEW HARDWARE WIZARD dialog box appears. Click CANCEL. For installations, using PLUG and PLAY function of your computer, ----->Printer Guide. D Set the CD-ROM into the CD-ROM drive of - Canon imageCLASS D680 | imageCLASS D680 Set-Up Instructions - Page 8
tab from the Printer Properties. M Click NEXT. Click YES if you want to print a test page, or NO if you do not want to print a test page is drive D. For installation instructions using PLUG and PLAY for USB Port, ----> Printer Guide. INSTALLING FROM CD-ROM MENU (Windows 2000/XP) 1) Make sure the
-
 1
1 -
 2
2 -
 3
3 -
 4
4 -
 5
5 -
 6
6 -
 7
7 -
8
 |
 |

For installation help and operational
instructions, call:
1-800-828-4040
1-800 OK CANON
U.S.A. CUSTOMERS
CANADA CUSTOMERS
Output Tray
L50 Cartridge
REMOVE ALL ITEMS FROM THE BOX
•
POWER CORD
•
TELEPHONE LINE*
•
DOCUMENTATION
(Set-up Instructions, Reference Guide, Fax Guide*,
Limited Warranty Card, Registration Card)
•
DESTINATION LABEL
*
•
CD-ROM
UNPACK MACHINE
1
SET-UP INSTRUCTIONS
imageCLASS D600 Series
Machine
*D680 Model
Pub. NO. FA7-3911-010
Printed in Thailand