Canon imageCLASS D680 imageCLASS D680 Set-Up Instructions - Page 8
Usb Cable - xp driver
 |
View all Canon imageCLASS D680 manuals
Add to My Manuals
Save this manual to your list of manuals |
Page 8 highlights
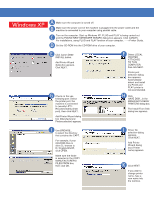
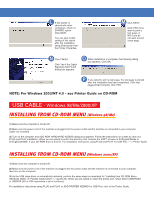
L If this printer is shared with other computers, check on SHARED option. Click NEXT. You can also modify setting of this option after the installation, using Sharing tab from the Printer Properties. M Click NEXT. Click YES if you want to print a test page, or NO if you do not want to print a test page. N Click FINISH. Click Yes if the Digital Signature Not Found dialog box appears. O When installation is complete, the following dialog box appears. Click OK. P If you opted to print a test page, the test page is printed after the installation has been completed. If the test page printed correctly, click YES. NOTE: For Windows 2000/NT 4.0 - see Printer Guide on CD-ROM USB CABLE - Windows 98/Me/2000/XP INSTALLING FROM CD-ROM MENU (Windows 98/Me) 1) Make sure the computer is turned off. 2) Make sure the power cord of the machine is plugged into the power outlet and the machine is connected to your computer (cable not included). 3) Turn on the computer and ADD NEW HARDWARE WIZARD dialog box appears. Follow the instructions on screen to carry out PLUG and PLAY installation. When you are asked to select the directory that contains the CAPT, browse to D:\English\Win9x or D:\English\WinME, if your CD-ROM drive is drive D. For installation instructions using PLUG and PLAY for USB Port, ----> Printer Guide. INSTALLING FROM CD-ROM MENU (Windows 2000/XP) 1) Make sure the computer is turned off. 2) Make sure the power cord of the machine is plugged into the power outlet and the machine is connected to your computer, then turn on the computer. 3) As the USB class driver is automatically detected, perform the same steps as described for "Installing from CD-ROM Menu (Windows 2000)" of "Parallel Cable Users" (--->pp.25-30). When you are asked to select the printer port, select either USBPRNXX or USBXXX (XX or XXX represents a set of numbers). For installation instructions using PLUG and PLAY or ADD PRINTER WIZARD for USB Port, refer to the Printer Guide.
-
 1
1 -
2
-
 3
3 -
 4
4 -
 5
5 -
 6
6 -
 7
7 -
 8
8
 |
 |
