Canon imageFORMULA RS40 Photo and Instruction Manual - Page 20
Adjust the document guides to fit the width of the photo, Pull out the feed support.
 |
View all Canon imageFORMULA RS40 Photo and manuals
Add to My Manuals
Save this manual to your list of manuals |
Page 20 highlights
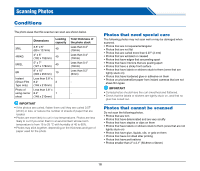
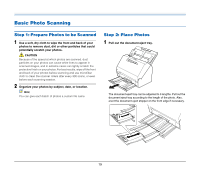
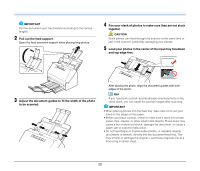
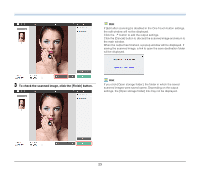
IMPORTANT Pull the document eject tray forward according to the various lengths. 2 Pull out the feed support. Open the feed extension support when placing long photos. 4 Fan your stack of photos to make sure they are not stuck together. CAUTION Stuck photos can feed through the scanner at the same time or jam in the scanner, potentially damaging your photos. 5 Load your photos in the center of the input tray facedown and top edge first. 3 Adjust the document guides to fit the width of the photo to be scanned. After placing the photo, align the document guides with both edges of the photo. Hint If you have both portrait- and landscape-oriented photos in the same stack, you can rotate the portrait images after scanning. IMPORTANT • When placing photos into the feed tray, take care not to cut your hand on the edges of the paper. • Before you place a photo, check to make sure it does not contain paper clips, staples, or other small metal objects. These items may cause a fire or electrical shock, damage the document, or cause a paper jam or scanner malfunction. • Do not load fragile or irreplaceable photos, or valuable original documents or artwork, directly into the document feed tray. This may wrinkle or damage the original. Load these originals one at a time using a carrier sheet. 20
-
 1
1 -
2
-
3
-
4
-
5
-
6
-
7
-
8
-
9
-
10
-
11
-
12
-
13
-
14
-
 15
15 -
 16
16 -
 17
17 -
 18
18 -
 19
19 -
 20
20 -
 21
21 -
 22
22 -
 23
23 -
 24
24 -
 25
25 -
26
-
27
-
28
-
29
-
30
-
31
-
32
-
33
-
34
-
35
-
36
-
37
-
38
-
39
-
40
-
41
-
42
-
43
-
44
-
45
-
46
-
47
-
48
-
49
-
50
-
51
-
52
-
53
-
54
-
55
-
56
-
57
-
58
-
59
-
60
-
61
-
62
 |
 |
