Canon imageFORMULA RS40 Photo and Instruction Manual - Page 25
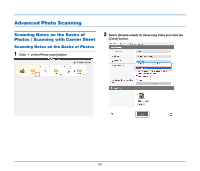
Scanning with Carrier Sheet, Click the [Photo scan] button to scan the photos.
 |
View all Canon imageFORMULA RS40 Photo and manuals
Add to My Manuals
Save this manual to your list of manuals |
Page 25 highlights
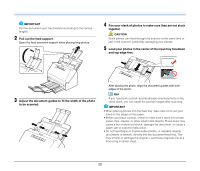
3 Click the [Photo scan] button to scan the photos. 3 Load the photo with the sealed end of the carrier sheet as the leading edge. Scanning with Carrier Sheet To prevent damage to a photo while scanning it, insert it into an optional carrier sheet before loading it in the scanner. 1 Set the scanning conditions. 2 Insert the photo into the carrier sheet. . After placing the photo, align the photo guides with both edges of the photo. CAUTION If the photo is not placed properly inside the carrier sheet, you may get a document jam or not get a scan image as intended. IMPORTANT • Insert documents straight into the center of the carrier sheet. Proper scanning will not be possible if the photo is too close to either side, tilted, or protruding from the carrier sheet. Yes No No No • When scanning instant photos, put the thick part (enclosed in red in the illustration) toward the right or left edge of the carrier sheet. This part might be detected as a double feed error when it passes through the center rollers of the scanner. Yes Yes No No 25
-
 1
1 -
2
-
3
-
4
-
5
-
6
-
7
-
8
-
9
-
10
-
11
-
12
-
13
-
14
-
15
-
16
-
17
-
18
-
19
-
 20
20 -
 21
21 -
 22
22 -
 23
23 -
 24
24 -
 25
25 -
 26
26 -
 27
27 -
 28
28 -
 29
29 -
 30
30 -
31
-
32
-
33
-
34
-
35
-
36
-
37
-
38
-
39
-
40
-
41
-
42
-
43
-
44
-
45
-
46
-
47
-
48
-
49
-
50
-
51
-
52
-
53
-
54
-
55
-
56
-
57
-
58
-
59
-
60
-
61
-
62
 |
 |
