Canon imagePROGRAF GP-4000 imagePROGRAF GP-4000 / GP-2000 Setup Guide - Page 7
Turning On the Printer
 |
View all Canon imagePROGRAF GP-4000 manuals
Add to My Manuals
Save this manual to your list of manuals |
Page 7 highlights
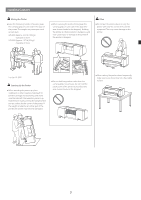
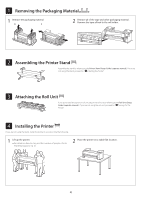
5 Turning On the Printer 1 Open the top cover. 2 Pull up and remove the belt stopper. ● Keep the belt stopper for future use. You will need it in case you move the printer to another location. 3 Remove the tape and protective material. ●Peel off the tape affixed to the carriage, and then pull the protective material (the area shown shaded in the diagram) towards you and remove it. Remove the protective sheet if there is one attached. 4 Close the top cover. 5 Connect the power cord to the printer. ● Insert the power cord into the power connector on the rear of the printer. For the GP-2000 For the GP-4000 5
-
 1
1 -
 2
2 -
 3
3 -
 4
4 -
 5
5 -
 6
6 -
 7
7 -
 8
8 -
 9
9 -
 10
10 -
 11
11 -
 12
12 -
13
-
14
-
15
-
16
-
17
-
18
-
19
-
20
-
21
-
22
-
23
-
24
-
25
-
26
-
27
-
28
-
29
-
30
-
31
-
32
-
33
-
34
-
35
-
36
-
37
-
38
-
39
-
40
-
41
-
42
-
43
-
44
-
45
-
46
-
47
-
48
-
49
-
50
-
51
-
52
-
53
-
54
-
55
-
56
-
57
-
58
-
59
-
60
-
61
-
62
-
63
-
64
-
65
-
66
 |
 |

5
5
Turning On the Printer
1
Open the top cover.
2
Pull up and remove the belt stopper.
●
Keep the belt stopper for future use. You will need it in case you
move the printer to another location.
3
Remove the tape and protective material.
●
Peel off the tape affixed to the carriage, and then pull the
protective material (the area shown shaded in the diagram)
towards you and remove it. Remove the protective sheet if there
is one attached.
4
Close the top cover.
5
Connect the power cord to the printer.
●
Insert the power cord into the power connector on the rear of the printer.
For the GP-2000
For the GP-4000