Casio CTK7000 User Guide - Page 110
E-108
 |
View all Casio CTK7000 manuals
Add to My Manuals
Save this manual to your list of manuals |
Page 110 highlights
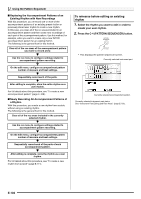
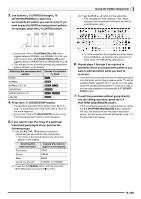
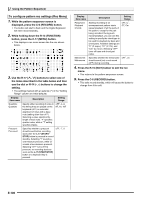
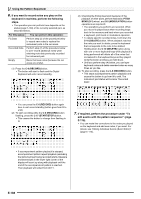
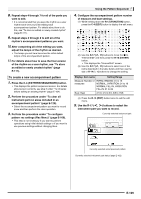
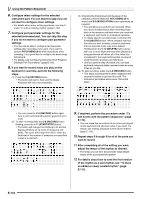
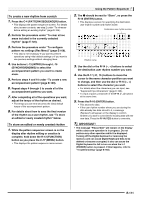
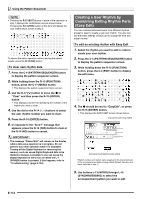
Using the Pattern Sequencer 6. If you want to record notes you play on the keyboard in real time, perform the following steps. • The operation you can perform here depends on the status (page E-103) of the currently selected part, as described below. For this status: You can perform this operation: Fix Data Perform step (2) of the procedure below to record new notes to replace the instrument parts in the rec areas. Recorded Data Perform step (2) of the procedure below to over-record additional notes while retaining note data previously recorded for instrument part. Empty Record all new notes (because the rec areas are empty). (1) Press the C-6 (RECORD) button. • The button will start to flash and the Digital Keyboard will enter record standby. (3) Checking the timing (beat and measure) of the playback of other parts, perform keyboard, PITCH BEND (S-1) wheel, and S-2 (MODULATION) button operations as required.0 • The operations you perform are recorded. What you record is played back when recording loops back to the measure and beat where you recorded a keyboard, pitch bend or modulation operation. • To delete specific recorded notes, hold down the C-10 (DELETE) button. When playback reaches the note you want to delete, press the keyboard that corresponds to the note to be deleted. Holding down the C-10 (DELETE) button along with one or more keyboard keys while playback is being performed will delete all of the notes that correspond to the keyboard keys as they played while the button and keys are held down. • Until you perform step (4) below, you can layer keyboard notes and delete recorded notes as many times as you like. (4) To stop recording, press the C-6 (RECORD) button. • This stops accompaniment pattern playback and causes the button to go from lit to unlit. The instrument part status will become "Recorded Data". • You can press the C-6 (RECORD) button again here to exit record standby (button goes from lit to unlit). (2) To start recording while the C-6 (RECORD) button flashing, press the L-17 (START/STOP) button. • This causes the button to change from flashing to lit. 7. If required, perform the procedure under "To edit events with the pattern sequencer" (page E-115). • You can make fine corrections to the notes you played on the keyboard and add new notes, if you want. For details, see "Editing Individual Events (Event Editor)" (page E-113). • If accompaniment pattern playback is stopped, accompaniment pattern repeat playback (excluding the instrument part being recorded) starts. Measure and beat values in the lower right corner of the display will count up along with playback until the end of the accompaniment pattern is reached. Then playback will restart from 001:1. E-108
-
 1
1 -
2
-
3
-
4
-
5
-
6
-
7
-
8
-
9
-
10
-
11
-
12
-
13
-
14
-
15
-
16
-
17
-
18
-
19
-
20
-
21
-
22
-
23
-
24
-
25
-
26
-
27
-
28
-
29
-
30
-
31
-
32
-
33
-
34
-
35
-
36
-
37
-
38
-
39
-
40
-
41
-
42
-
43
-
44
-
45
-
46
-
47
-
48
-
49
-
50
-
51
-
52
-
53
-
54
-
55
-
56
-
57
-
58
-
59
-
60
-
61
-
62
-
63
-
64
-
65
-
66
-
67
-
68
-
69
-
70
-
71
-
72
-
73
-
74
-
75
-
76
-
77
-
78
-
79
-
80
-
81
-
82
-
83
-
84
-
85
-
86
-
87
-
88
-
89
-
90
-
91
-
92
-
93
-
94
-
95
-
96
-
97
-
98
-
99
-
100
-
101
-
102
-
103
-
104
-
 105
105 -
 106
106 -
 107
107 -
 108
108 -
 109
109 -
 110
110 -
 111
111 -
 112
112 -
 113
113 -
 114
114 -
 115
115 -
116
-
117
-
118
-
119
-
120
-
121
-
122
-
123
-
124
-
125
-
126
-
127
-
128
-
129
-
130
-
131
-
132
-
133
-
134
-
135
-
136
-
137
-
138
-
139
-
140
-
141
-
142
-
143
-
144
-
145
-
146
-
147
-
148
-
149
-
150
-
151
-
152
-
153
-
154
-
155
-
156
-
157
-
158
-
159
-
160
-
161
-
162
-
163
-
164
-
165
-
166
-
167
-
168
 |
 |
