Casio CW-75 User Guide - Page 55
LABEL1, LABEL2, Important
 |
UPC - 079767163815
View all Casio CW-75 manuals
Add to My Manuals
Save this manual to your list of manuals |
Page 55 highlights
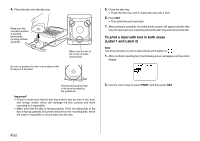
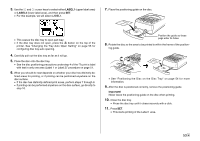
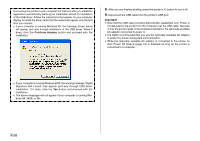
3. Use the c and v cursor keys to select either LABEL1 (upper label area) or LABEL2 (lower label area), and then press SET. • For this example, we will select LABEL1. 7. Place the positioning guide on the disc. • This causes the disc tray to open part way. • If the disc tray does not open, press the button on the top of the printer. See "Changing the Tray Auto Open Setting" on page 55 for configuring disc tray auto opening. 4. Carefully pull out the disc tray as far as it will go. 5. Place the disc onto the disc tray. • See the disc positioning precautions under step 4 of the "To print a label with text in only one area (Label 1 or Label 2)" procedure on page 51. 6. What you should do next depends on whether your disc has distinctly de- fined areas for printing, or if printing can be performed anywhere on the disc surface. • If the disc has distinctly defined print areas, perform steps 7 through 9. • If printing can be performed anywhere on the disc surface, go directly to step 10. Position the guide so these pegs enter its holes. 8. Rotate the disc so the area to be printed is within the frame of the position- ing guide. • See "Positioning the Disc on the Disc Tray" on page 54 for more information. 9. After the disc is positioned correctly, remove the positioning guide. Important! Never leave the positioning guide on the disc when printing. 10. Close the disc tray. • Press the disc tray until it closes securely with a click. 11. Press SET. • This starts printing of the Label 1 area. 53 E
-
 1
1 -
2
-
3
-
4
-
5
-
6
-
7
-
8
-
9
-
10
-
11
-
12
-
13
-
14
-
15
-
16
-
17
-
18
-
19
-
20
-
21
-
22
-
23
-
24
-
25
-
26
-
27
-
28
-
29
-
30
-
31
-
32
-
33
-
34
-
35
-
36
-
37
-
38
-
39
-
40
-
41
-
42
-
43
-
44
-
45
-
46
-
47
-
48
-
49
-
 50
50 -
 51
51 -
 52
52 -
 53
53 -
 54
54 -
 55
55 -
 56
56 -
 57
57 -
 58
58 -
 59
59 -
 60
60 -
61
-
62
-
63
-
64
-
65
-
66
-
67
-
68
-
69
-
70
 |
 |
