Casio CW-75 User Guide - Page 56
Positioning the Disc on the Disc Tray
 |
UPC - 079767163815
View all Casio CW-75 manuals
Add to My Manuals
Save this manual to your list of manuals |
Page 56 highlights
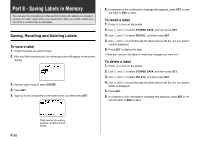
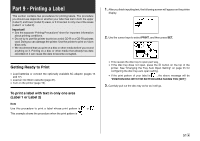
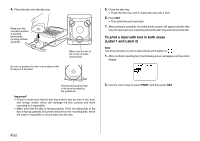
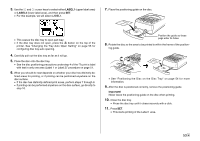
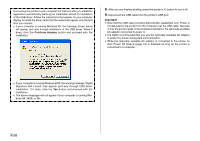
12. After printing of the Label 1 area is complete, a screen like the one shown here will appear, and the disc tray will open part way. Carefully pull out the disc tray and remove the disc. 13. Press SET. 14. Rotate the disc 180 degrees and place it back onto the disc tray. Label 1 printing 15. Repeat steps 7 through 9 to position the disc. • See "Positioning the Disc on the Disc Tray" in the right column of this page. 16. Close the disc tray and press SET. • This starts the Label 2 print operation. 17. After printing is complete, the initial printer screen will appear and the disc tray will open part way. Carefully pull out the disc tray and remove the disc. Positioning the Disc on the Disc Tray Use the positioning guide to adjust the position of the disc on the tray in the following cases. • When the label of the disc already has logos or other markings • When performing separate upper block and lower block printings When the label of the disc already has logos or other markings Note that you cannot print over a logo. Position the disc so the logo or other markings on the disc label are not inside the shaded area. Printing will be performed inside the area indicated by the guidelines on the disc tray. Guidelines When performing separate upper block and lower block printings Before performing the second printing, rotate the disc 180 degrees. Next, position the disc so the first printing is within the shaded area. Area of first printing (Label 1) Area of second printing (Label 2) E 54
-
 1
1 -
2
-
3
-
4
-
5
-
6
-
7
-
8
-
9
-
10
-
11
-
12
-
13
-
14
-
15
-
16
-
17
-
18
-
19
-
20
-
21
-
22
-
23
-
24
-
25
-
26
-
27
-
28
-
29
-
30
-
31
-
32
-
33
-
34
-
35
-
36
-
37
-
38
-
39
-
40
-
41
-
42
-
43
-
44
-
45
-
46
-
47
-
48
-
49
-
50
-
 51
51 -
 52
52 -
 53
53 -
 54
54 -
 55
55 -
 56
56 -
 57
57 -
 58
58 -
 59
59 -
 60
60 -
 61
61 -
62
-
63
-
64
-
65
-
66
-
67
-
68
-
69
-
70
 |
 |
