Casio CW-75 User Guide - Page 60
Continue Anyway, Important - driver
 |
UPC - 079767163815
View all Casio CW-75 manuals
Add to My Manuals
Save this manual to your list of manuals |
Page 60 highlights
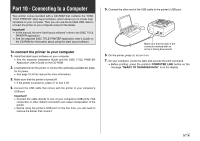
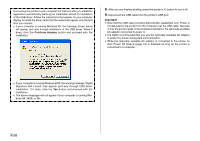
Connecting the printer to your computer the first time after you install the application automatically starts up an installation wizard for installation of the USB driver. Follow the instructions that appear on your computer display to install the driver. Note that the wizard will appear only the first time you connect. • If your computer is running Windows XP, the message shown below will appear part way through installation of the USB driver. When it does, click the Continue Anyway button and proceed with the installation. 8. After you are finished printing, press the printer's ] button to turn it off. 9. Disconnect the USB cable from the printer's USB port. Important! • Note that the USB cable provides data transfer capabilities only. Power is not delivered to the printer from the computer over the USB cable. Because of this, the printer needs to have batteries installed or the optionally available AC adaptor connected to power it. • It is highly recommended that you use the optionally available AC adaptor to power the printer during data communication. • While the optionally available AC adaptor is connected to the printer, its Auto Power Off feature (page 19) is disabled as long as the printer is connected to a computer. • If your computer is running Windows 2000, the warning message "Digital Signature Not Found" may appear part way through USB driver installation. If it does, click the Yes button and proceed with the installation. • The above messages will not appear if your computer is running Windows 98, 98SE, or Me. E 58
-
 1
1 -
2
-
3
-
4
-
5
-
6
-
7
-
8
-
9
-
10
-
11
-
12
-
13
-
14
-
15
-
16
-
17
-
18
-
19
-
20
-
21
-
22
-
23
-
24
-
25
-
26
-
27
-
28
-
29
-
30
-
31
-
32
-
33
-
34
-
35
-
36
-
37
-
38
-
39
-
40
-
41
-
42
-
43
-
44
-
45
-
46
-
47
-
48
-
49
-
50
-
51
-
52
-
53
-
54
-
 55
55 -
 56
56 -
 57
57 -
 58
58 -
 59
59 -
 60
60 -
 61
61 -
 62
62 -
 63
63 -
 64
64 -
 65
65 -
66
-
67
-
68
-
69
-
70
 |
 |
