Casio EX-Z270 Owners Manual - Page 194
Step 1. Upload Your Photos, Step 2. Review Your Uploaded Photos, Step 3. Select a Background - pink review
 |
View all Casio EX-Z270 manuals
Add to My Manuals
Save this manual to your list of manuals |
Page 194 highlights
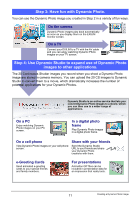
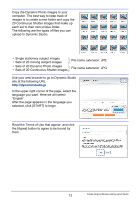
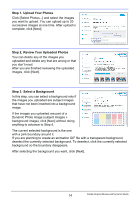
Step 1. Upload Your Photos Click [Select Photos...] and select the images you want to upload. You can upload up to 20 successive images at one time. After upload is complete, click [Next]. Step 2. Review Your Uploaded Photos You can delete any of the images you uploaded and delete any that are wrong or that you don't need. After you are finished reviewing the uploaded images, click [Next]. Step 3. Select a Background In this step, you can select a background only if the images you uploaded are subject images that have not been inserted into a background image. If the images you uploaded are part of a Dynamic Photo image (subject images + background image), click [Next] without doing anything to advance to Step 4. The current selected background is the one with a pink boundary around it. If you are planning to create an animation GIF file with a transparent background, deselect the currently selected background. To deselect, click the currently selected background so the boundary disappears. After selecting the background you want, click [Next]. 14 Create Original Movies with Dynamic Studio
-
 1
1 -
2
-
3
-
4
-
5
-
6
-
7
-
8
-
9
-
10
-
11
-
12
-
13
-
14
-
15
-
16
-
17
-
18
-
19
-
20
-
21
-
22
-
23
-
24
-
25
-
26
-
27
-
28
-
29
-
30
-
31
-
32
-
33
-
34
-
35
-
36
-
37
-
38
-
39
-
40
-
41
-
42
-
43
-
44
-
45
-
46
-
47
-
48
-
49
-
50
-
51
-
52
-
53
-
54
-
55
-
56
-
57
-
58
-
59
-
60
-
61
-
62
-
63
-
64
-
65
-
66
-
67
-
68
-
69
-
70
-
71
-
72
-
73
-
74
-
75
-
76
-
77
-
78
-
79
-
80
-
81
-
82
-
83
-
84
-
85
-
86
-
87
-
88
-
89
-
90
-
91
-
92
-
93
-
94
-
95
-
96
-
97
-
98
-
99
-
100
-
101
-
102
-
103
-
104
-
105
-
106
-
107
-
108
-
109
-
110
-
111
-
112
-
113
-
114
-
115
-
116
-
117
-
118
-
119
-
120
-
121
-
122
-
123
-
124
-
125
-
126
-
127
-
128
-
129
-
130
-
131
-
132
-
133
-
134
-
135
-
136
-
137
-
138
-
139
-
140
-
141
-
142
-
143
-
144
-
145
-
146
-
147
-
148
-
149
-
150
-
151
-
152
-
153
-
154
-
155
-
156
-
157
-
158
-
159
-
160
-
161
-
162
-
163
-
164
-
165
-
166
-
167
-
168
-
169
-
170
-
171
-
172
-
173
-
174
-
175
-
176
-
177
-
178
-
179
-
180
-
181
-
182
-
183
-
184
-
185
-
186
-
187
-
188
-
 189
189 -
 190
190 -
 191
191 -
 192
192 -
 193
193 -
 194
194 -
 195
195 -
 196
196 -
 197
197 -
 198
198 -
 199
199 -
200
-
201
-
202
 |
 |
