Casio EX-Z270 Owners Manual - Page 35
Specifying the Auto Focus Area (AF Area), to select the setting you want and then press [SET].
 |
View all Casio EX-Z270 manuals
Add to My Manuals
Save this manual to your list of manuals |
Page 35 highlights
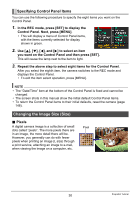
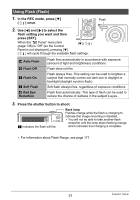
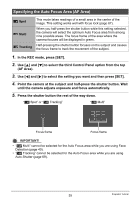
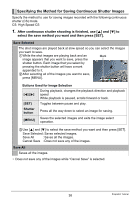
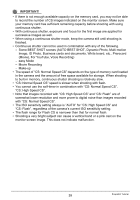
Specifying the Auto Focus Area (AF Area) Í Spot È Multi Ë Tracking This mode takes readings of a small area in the center of the image. This setting works well with focus lock (page 67). When you half-press the shutter button while this setting selected, the camera will select the optimum Auto Focus area from among nine possible areas. The focus frame of the area where the camera focuses will be displayed in green. Half-pressing the shutter button focuses on the subject and causes the focus frame to track the movement of the subject. 1. In the REC mode, press [SET]. 2. Use [8] and [2] to select the third Control Panel option from the top (AF Area). 3. Use [4] and [6] to select the setting you want and then press [SET]. 4. Point the camera at the subject and half-press the shutter button. Wait until the camera adjusts exposure and focus automatically. 5. Press the shutter button the rest of the way down. "Í Spot" or "Ë Tracking" "È Multi" Focus frame Focus frame IMPORTANT! • "È Multi" cannot be selected for the Auto Focus area while you are using Face Detection (page 40). • "Ë Tracking" cannot be selected for the Auto Focus area while you are using Auto Shutter (page 69). 35 Snapshot Tutorial
-
 1
1 -
2
-
3
-
4
-
5
-
6
-
7
-
8
-
9
-
10
-
11
-
12
-
13
-
14
-
15
-
16
-
17
-
18
-
19
-
20
-
21
-
22
-
23
-
24
-
25
-
26
-
27
-
28
-
29
-
 30
30 -
 31
31 -
 32
32 -
 33
33 -
 34
34 -
 35
35 -
 36
36 -
 37
37 -
 38
38 -
 39
39 -
 40
40 -
41
-
42
-
43
-
44
-
45
-
46
-
47
-
48
-
49
-
50
-
51
-
52
-
53
-
54
-
55
-
56
-
57
-
58
-
59
-
60
-
61
-
62
-
63
-
64
-
65
-
66
-
67
-
68
-
69
-
70
-
71
-
72
-
73
-
74
-
75
-
76
-
77
-
78
-
79
-
80
-
81
-
82
-
83
-
84
-
85
-
86
-
87
-
88
-
89
-
90
-
91
-
92
-
93
-
94
-
95
-
96
-
97
-
98
-
99
-
100
-
101
-
102
-
103
-
104
-
105
-
106
-
107
-
108
-
109
-
110
-
111
-
112
-
113
-
114
-
115
-
116
-
117
-
118
-
119
-
120
-
121
-
122
-
123
-
124
-
125
-
126
-
127
-
128
-
129
-
130
-
131
-
132
-
133
-
134
-
135
-
136
-
137
-
138
-
139
-
140
-
141
-
142
-
143
-
144
-
145
-
146
-
147
-
148
-
149
-
150
-
151
-
152
-
153
-
154
-
155
-
156
-
157
-
158
-
159
-
160
-
161
-
162
-
163
-
164
-
165
-
166
-
167
-
168
-
169
-
170
-
171
-
172
-
173
-
174
-
175
-
176
-
177
-
178
-
179
-
180
-
181
-
182
-
183
-
184
-
185
-
186
-
187
-
188
-
189
-
190
-
191
-
192
-
193
-
194
-
195
-
196
-
197
-
198
-
199
-
200
-
201
-
202
 |
 |
