Casio LK100 User Guide - Page 11
Rhythm Controller, Step Lesson - music keyboard
 |
UPC - 718122208418
View all Casio LK100 manuals
Add to My Manuals
Save this manual to your list of manuals |
Page 11 highlights
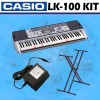
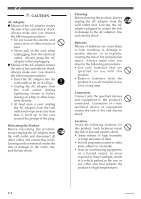
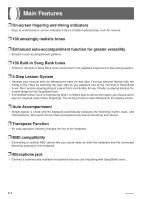
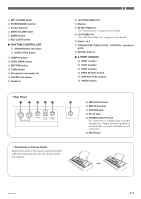
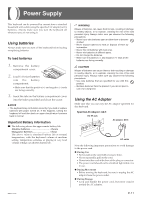
1 MIC VOLUME slider 2 POWER/MODE selector 3 Power indicator 4 MAIN VOLUME slider 5 DEMO button 6 KEY LIGHT button G RHYTHM CONTROLLER 7 SYNCHRO/FILL-IN button 8 START/STOP button 9 TEMPO buttons 0 SONG BANK button A RHYTHM button B TONE button C Percussion instrument list D CHORD root names E Speakers F 100 SONG BANK list G Display H 50 RHYTHMS list See "Rhythm List" on page A-2 for details. I 100 TONES list See "GM Tone Map List" on page A-1 for details. J Voice 1 to 5 K TRANSPOSE/TUNE/LOCAL CONTROL operation guide L Number buttons G 3-STEP LESSON M STEP 1 button N STEP 2 button O STEP 3 button P PART SELECT button Q ONE KEY PLAY buttons R SPEAK button * Rear Panel S T U VW X ** Attachment of Score Stand Insert both ends of the music stand provided with the keyboard into the two holes on the top surface. S MIDI OUT terminal T MIDI IN terminal U SUSTAIN jack V DC 9V jack W PHONES/OUTPUT jack For connection of commercially available headphones. Output from the speakers is automatically cut when headphones are connected. X MIC IN jack 662A-E-011A E-9
-
 1
1 -
2
-
3
-
4
-
5
-
 6
6 -
 7
7 -
 8
8 -
 9
9 -
 10
10 -
 11
11 -
 12
12 -
 13
13 -
 14
14 -
 15
15 -
 16
16 -
17
-
18
-
19
-
20
-
21
-
22
-
23
-
24
-
25
-
26
-
27
-
28
-
29
-
30
-
31
-
32
-
33
-
34
-
35
-
36
-
37
-
38
-
39
-
40
 |
 |