Celestron CPC Deluxe 925 HD Computerized Telescope CPC Deluxe HD Manual - Page 27
Celestial Photography
 |
View all Celestron CPC Deluxe 925 HD Computerized Telescope manuals
Add to My Manuals
Save this manual to your list of manuals |
Page 27 highlights
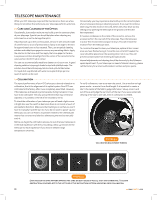
CELESTIAL PHOTOGRAPHY After looking at the night sky for a while, you may want to try photographing it. Several forms of celestial photography are possible with your telescope, including short exposure prime focus, eyepiece projection, long exposure deep sky, terrestrial and even CCD imaging. Each of these is discussed in moderate detail with enough information to get you started. Topics include the accessories required and some simple techniques. More information is available in some of the publications listed at the end of this manual. In addition to the specific accessories required for each type of celestial photography, there is the need for a camera - but not just any camera. The camera does not have to have many of the features offered on today's state-of-the-art equipment. For example, you don't need auto focus capability or mirror lock up. Here are the mandatory features a camera needs for celestial photography. First, a "B" setting is required which allows for time exposures. This excludes point and shoot cameras and limits the selection to SLR cameras, the most common type of 35 mm camera on the market today. Second, the "B" or manual setting should NOT run off the battery. Many new electronic cameras use the battery to keep the shutter open during time exposures. Once the batteries are drained, usually after a few minutes, the shutter closes, whether you were finished with the exposure or not. Look for a camera that has a manual shutter when operating in the time exposure mode. Olympus, Nikon, Minolta, Pentax, Canon and others have made such camera bodies. The camera must have interchangeable lenses so you can attach it to the telescope and use a variety of lenses for piggyback photography. If you can't find a new camera, you can purchase a used camera body that is not 100% functional. The light meter, for example, does not have to be operational since you will be determining the exposure length manually. You will also need a cable release with a locking function to hold the shutter open. Mechanical and air release models are available. >> Short Exposure Prime Focus Photography Short exposure prime focus photography is the best way to begin recording celestial objects. It is done with the camera attached to the telescope without an eyepiece or camera lens in place. To attach your camera you need the Celestron T-Adapter (See Optional Accessories section) and a T-Ring for your specific camera (i.e., Canon, Nikon, etc.). The T-Ring replaces the 35 mm SLR camera's normal lens. Prime focus photography allows you to capture the majority of the lunar or solar disk. To attach your camera to your telescope: 1. Remove all visual accessories. (For the 9.25" and 11" tube you must also remove the 3" adapter plate threaded onto the rear of the tube) 2. Thread the T-Ring onto the T-Adapter. 3. Mount your camera body onto the T-Ring the same as you would for a standard camera lens. 4. Thread the T-Adapter onto the back of the telescope while holding the camera in the desired orientation (either vertical or horizontal). With your camera attached to the telescope, you are ready for prime focus photography. Start with an easy object like the Moon. Here's how to do it: 1. Center the Moon in the field of your telescope. 2. Focus the telescope by turning the focus knob until the image is sharp. Make sure the mirror lock knobs are loosened. 3. Set the shutter speed to the appropriate setting (see Figure 8-1). 4. Trip the shutter using a cable release or self timer. 5. Use your camera's bracketing feature to automatically change exposure time in order to find the best exposure. The exposure times listed in table 8-1 should be used as a starting point. Always make exposures that are longer and shorter than the recommended time. Also, take a few photos at each shutter speed. This will ensure that you will get a good photo. • This technique is also used for photographing the Sun with the proper solar filter. >> www.celestron.com Lunar Phase Crescent Quarter Full ISO 50 1/2 1/15 1/30 ISO 100 1/4 1/30 1/60 ISO 200 1/8 1/60 1/125 ISO 400 1/15 1/125 1/250 FIGURE 8-1 Above is a listing of recommended exposure times when photographing the Moon at the prime focus of your telescope. T-Adapter T-Ring (camera model specific) FIGURE 8-2a T-Adapter for 8" Optical Tube T-Adapter T-Ring (camera model specific) FIGURE 8-2b T-Adapter for 11/14" Optical Tube 25
-
 1
1 -
2
-
3
-
4
-
5
-
6
-
7
-
8
-
9
-
10
-
11
-
12
-
13
-
14
-
15
-
16
-
17
-
18
-
19
-
20
-
21
-
 22
22 -
 23
23 -
 24
24 -
 25
25 -
 26
26 -
 27
27 -
 28
28 -
 29
29 -
 30
30 -
 31
31 -
 32
32 -
33
-
34
-
35
-
36
-
37
-
38
-
39
-
40
-
41
-
42
-
43
-
44
-
45
-
46
-
47
-
48
-
49
-
50
 |
 |
