Celestron CPC Deluxe 925 HD Computerized Telescope CPC Deluxe HD Manual - Page 31
No Connect, Ground, RA Right, DEC Up, DEC Down, RA Left
 |
View all Celestron CPC Deluxe 925 HD Computerized Telescope manuals
Add to My Manuals
Save this manual to your list of manuals |
Page 31 highlights
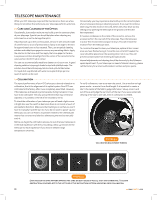
The key factors for good CCD imaging are; exposure time, field-ofview, image size and pixel resolution. As the f-number goes down (or gets faster), the exposure times needed decreases, the field-of-viewincreases, but the image scale of the object gets smaller. What is the difference between f/2 and f/10? F/2 has 1/5 the focal length of f/10. That makes the exposure time needed about 25 times shorter than at f/10, the field of view 5 times larger and the object size 1/5 compared to that of f/10 (see Figure 8-8). Telescope Standard f/10 f/2 Model Configuration Configuration 8" 80" (2032 mm) 16" (406.4 mm) 9.25" 93" (2350 mm) 18.5" (470 mm) 11" 110" (2800 mm) 23.1" (587 mm) FIGURE 8-8 Auto Guiding The CPC has a designated auto guiding port for use with a CCD autoguider. Figure 8-9 may be useful when connecting the CCD camera cable to the CPC and calibrating the autoguider. Note that the four outputs are active-low with internal pull-ups and are capable of sinking 25 mA DC. 12 3456 1 = No Connect 2 = Ground 3 = +RA (Right) 4 = +DEC (Up) 5 = -DEC (Down) 6 = -RA (Left) FIGURE 8-9 Pin out diagram for Autoguider >> www.celestron.com 29
-
 1
1 -
2
-
3
-
4
-
5
-
6
-
7
-
8
-
9
-
10
-
11
-
12
-
13
-
14
-
15
-
16
-
17
-
18
-
19
-
20
-
21
-
22
-
23
-
24
-
25
-
 26
26 -
 27
27 -
 28
28 -
 29
29 -
 30
30 -
 31
31 -
 32
32 -
 33
33 -
 34
34 -
 35
35 -
 36
36 -
37
-
38
-
39
-
40
-
41
-
42
-
43
-
44
-
45
-
46
-
47
-
48
-
49
-
50
 |
 |
