Celestron CPC Deluxe 925 HD Computerized Telescope CPC Deluxe HD Manual - Page 9
Powering the CPC
 |
View all Celestron CPC Deluxe 925 HD Computerized Telescope manuals
Add to My Manuals
Save this manual to your list of manuals |
Page 9 highlights
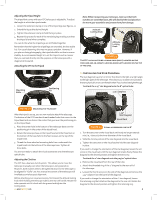
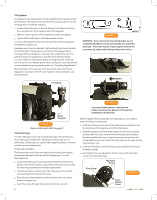
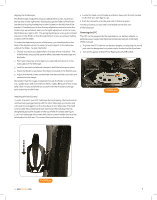
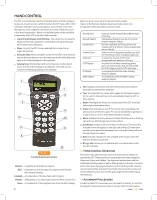
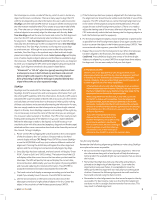
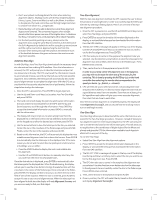
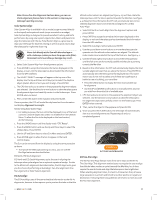
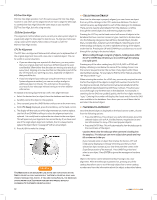
Aligning the Finderscope The finderscope is adjusted using two adjustment screws, located on the top and on the right (when looking though the finder) of the finder bracket and a spring loaded pivot screw (located on the left side of the bracket). This allows you to turn the top adjustment screw to move the finderscope up and down, and turn the right adjustment screw to move the finderscope right to left. The spring loaded pivot screw puts constant pressure on the finder so that the adjustment screws are always making contact with the finder. To make the alignment process a little easier, you should perform this task in the daytime when it is easier to locate objects in the telescope without the finder. To align the finder: 1. Choose a conspicuous object that is in excess of one mile away. This will eliminate any possible parallax effect between the telescope and the finder. 2. Point your telescope at the object you selected and center it in the main optics of the telescope. 3. Lock the azimuth and altitude clamps to hold the telescope in place. 4. Check the finder to see where the object is located in the field of view. 5. Adjust the thumb screws on the finder bracket until the cross hairs are centered on the target. Remember that the image orientation through the finder is inverted (i.e., upside down and reversed from left-to-right). Because of this, it may take a few minutes to familiarize yourself with the directional change each screw has on the finder. • Locate the hand control holder and slide it down into the slot located on the fork arm (see figure 3-9). • Push the connector into the jack until it clicks into place. The hand control can now rest in the holder on the fork arm of the telescope. Powering the CPC The CPC can be powered by the supplied 12v car battery adapter or optional power supply (see Optional Accessories section in the back of this manual). 1. To power the CPC with the car battery adapter, simply plug the round post into the designated 12v power outlet located on the drive base. 2. Turn on the power to the CPC by flipping the On/Off switch. 12v Input Jack On/Off Switch Hand Control Port FIGURE 3-10 Attaching the Hand Control In order to protect your CPC telescope during shipping, the hand control unit has been packaged along with the other telescope accessories and will need to be plugged in to the drive base of your telescope. The hand control cable has a phone jack style connector that will plug into the designated jack outlet located on the top of the drive base (see figure 3-10). Your telescope also comes with a hand control holder that must be attached to the fork arm. To connect the hand control to the fork arm: FIGURE 3-9 >> www.celestron.com 7
-
 1
1 -
2
-
3
-
 4
4 -
 5
5 -
 6
6 -
 7
7 -
 8
8 -
 9
9 -
 10
10 -
 11
11 -
 12
12 -
 13
13 -
 14
14 -
15
-
16
-
17
-
18
-
19
-
20
-
21
-
22
-
23
-
24
-
25
-
26
-
27
-
28
-
29
-
30
-
31
-
32
-
33
-
34
-
35
-
36
-
37
-
38
-
39
-
40
-
41
-
42
-
43
-
44
-
45
-
46
-
47
-
48
-
49
-
50
 |
 |
