Cisco 827H Hardware Installation Guide - Page 25
Mounting the Router, Mounting on a Table
 |
UPC - 746320697826
View all Cisco 827H manuals
Add to My Manuals
Save this manual to your list of manuals |
Page 25 highlights
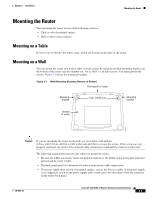
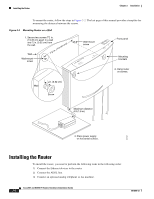
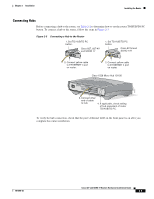
Chapter 2 Installation Mounting the Router Mounting the Router You can mount the router on one of the following surfaces: • Table or other horizontal surface • Wall or other vertical surface Mounting on a Table Do not cover or obstruct the router vents, which are located on the sides of the router. Mounting on a Wall You can mount the router on a wall or other vertical surface by using the molded mounting brackets on the bottom of the router and two number-six, 3/4-in. (M3.5 x 20 mm) screws. You must provide the screws. Figure 2-1 shows the mounting brackets. Figure 2-1 Wall-Mounting Brackets (Bottom of Router) Front panel of router Mounting bracket 7 5 8 in. (19.35 cm) Mounting bracket Bottom of router 11671 Caution If you are mounting the router on drywall, use two hollow wall-anchors (1/8-in. with 5/16-in. drill bit, or M3 with 8-mm drill bit) to secure the screws. If the screws are not properly anchored, the strain of the network cable connections could pull the router from the wall. The following requirements must be met when you mount the router: • Because the LEDs are used as status and problem indicators, the LEDs on the front panel must face upward and be easily visible. • The back panel must face downward to reduce strain on the cable connections. • The power supply must rest on a horizontal surface, such as the floor or a table. If the power supply is not supported, strain on the power supply cable could cause it to disconnect from the connector on the router back panel. 78-6854-03 Cisco 827 and SOHO 77 Routers Hardware Installation Guide 2-5
-
 1
1 -
2
-
3
-
4
-
5
-
6
-
7
-
8
-
9
-
10
-
11
-
12
-
13
-
14
-
15
-
16
-
17
-
18
-
19
-
 20
20 -
 21
21 -
 22
22 -
 23
23 -
 24
24 -
 25
25 -
 26
26 -
 27
27 -
 28
28 -
 29
29 -
 30
30 -
31
-
32
-
33
-
34
-
35
-
36
-
37
-
38
-
39
-
40
-
41
-
42
-
43
-
44
-
45
-
46
-
47
-
48
-
49
-
50
-
51
-
52
 |
 |
