Cisco AIR-AP1121G-E-K9 Hardware Installation Guide - Page 43
Assigning an IP Address Using the CLI, Using a Telnet Session to Access the CLI
 |
View all Cisco AIR-AP1121G-E-K9 manuals
Add to My Manuals
Save this manual to your list of manuals |
Page 43 highlights
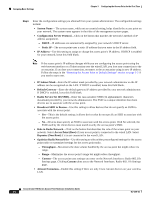
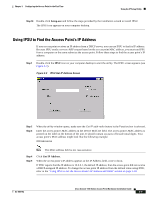
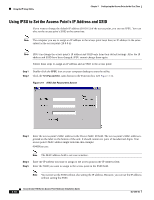
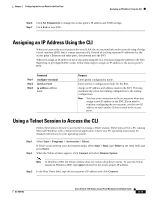
Chapter 3 Configuring the Access Point for the First Time Assigning an IP Address Using the CLI Step 6 Click Set Parameters to change the access point's IP address and SSID settings. Step 7 Click Exit to exit IPSU. Assigning an IP Address Using the CLI When you connect the access point to the wired LAN, the access point links to the network using a bridge virtual interface (BVI) that it creates automatically. Instead of tracking separate IP addresses for the access point's Ethernet and radio ports, the network uses the BVI. When you assign an IP address to the access point using the CLI, you must assign the address to the BVI. Beginning in privileged EXEC mode, follow these steps to assign an IP address to the access point's BVI: Step 1 Step 2 Step 3 Command configure terminal interface bvi1 ip address address mask Purpose Enter global configuration mode. Enter interface configuration mode for the BVI. Assign an IP address and address mask to the BVI. This step automatically saves the running configuration to the startup configuration. Note You lose your connection to the access point when you assign a new IP address to the BVI. If you need to continue configuring the access point, use the new IP address to open another Telnet session to the access point. Using a Telnet Session to Access the CLI Follow these steps to browse to access the CLI using a Telnet session. These steps are for a PC running Microsoft Windows with a Telnet terminal application. Check your PC operating instructions for detailed instructions for your operating system. Step 1 Step 2 Select Start > Programs > Accessories > Telnet. If Telnet is not listed in your Accessories menu, select Start > Run, type Telnet in the entry field, and press Enter. When the Telnet window appears, click Connect and select Remote System. Note In Windows 2000, the Telnet window does not contain drop-down menus. To start the Telnet session in Windows 2000, type open followed by the access point's IP address. Step 3 In the Host Name field, type the access point's IP address and click Connect. OL-4309-02 Cisco Aironet 1100 Series Access Point Hardware Installation Guide 3-11
-
 1
1 -
2
-
3
-
4
-
5
-
6
-
7
-
8
-
9
-
10
-
11
-
12
-
13
-
14
-
15
-
16
-
17
-
18
-
19
-
20
-
21
-
22
-
23
-
24
-
25
-
26
-
27
-
28
-
29
-
30
-
31
-
32
-
33
-
34
-
35
-
36
-
37
-
 38
38 -
 39
39 -
 40
40 -
 41
41 -
 42
42 -
 43
43 -
 44
44 -
 45
45 -
 46
46 -
 47
47 -
 48
48 -
49
-
50
-
51
-
52
-
53
-
54
-
55
-
56
-
57
-
58
-
59
-
60
-
61
-
62
-
63
-
64
-
65
-
66
-
67
-
68
-
69
-
70
-
71
-
72
-
73
-
74
-
75
-
76
-
77
-
78
-
79
-
80
-
81
-
82
-
83
-
84
-
85
-
86
-
87
-
88
-
89
-
90
-
91
-
92
-
93
-
94
-
95
-
96
-
97
-
98
-
99
-
100
-
101
-
102
-
103
-
104
-
105
-
106
-
107
-
108
-
109
-
110
-
111
-
112
-
113
-
114
-
115
-
116
-
117
-
118
-
119
-
120
-
121
-
122
 |
 |
