Cisco CISCO815-VPN/K9 Hardware Installation Guide - Page 40
Connecting the Power Supply, Mounting Your Router, Mounting on a Table
 |
UPC - 882658121388
View all Cisco CISCO815-VPN/K9 manuals
Add to My Manuals
Save this manual to your list of manuals |
Page 40 highlights
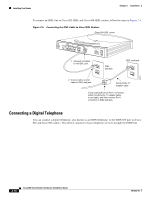
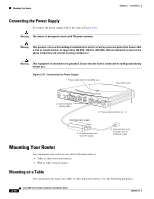
Mounting Your Router Chapter 2 Installation Connecting the Power Supply To connect the power supply, follow the steps in Figure 2-10. Warning The device is designed to work with TN power systems. Warning This product relies on the building's installation for short-circuit (overcurrent) protection. Ensure that a fuse or circuit breaker no larger than 120 VAC, 15A U.S. (240 VAC, 16A international) is used on the phase conductors (all current-carrying conductors). Warning This equipment is intended to be grounded. Ensure that the host is connected to earth ground during normal use. Figure 2-10 Connecting the Power Supply 1. Press power switch to standby ( ). Cisco 803 router 11673 HUB NO HUB ETHERNET 10 BASE T 0 1 2 3 2. Connect power supply cable. Cisco 803 CONSOLE ISDN S/T PHONE 1 2 5. Press power switch to on ( ). Desktop power supply 3. Connect power cord to power supply. 4. Connect other end of power cord to electrical outlet. Mounting Your Router You can mount your router on one of the following surfaces: • Table or other horizontal surface • Wall or other vertical surface Mounting on a Table You can mount your router on a table or other horizontal surface. Use the following guidelines: 2-18 Cisco 800 Series Routers Hardware Installation Guide 78-5373-04
-
 1
1 -
2
-
3
-
4
-
5
-
6
-
7
-
8
-
9
-
10
-
11
-
12
-
13
-
14
-
15
-
16
-
17
-
18
-
19
-
20
-
21
-
22
-
23
-
24
-
25
-
26
-
27
-
28
-
29
-
30
-
31
-
32
-
33
-
34
-
 35
35 -
 36
36 -
 37
37 -
 38
38 -
 39
39 -
 40
40 -
 41
41 -
 42
42 -
 43
43 -
 44
44 -
 45
45 -
46
-
47
-
48
-
49
-
50
-
51
-
52
-
53
-
54
-
55
-
56
-
57
-
58
-
59
-
60
-
61
-
62
-
63
-
64
-
65
-
66
-
67
-
68
-
69
-
70
 |
 |