Cisco E3000 User Manual - Page 19
Network Setup, IP Address, Subnet Mask, DHCP Server, DHCP Reservation, Select Clients from DHCP Table - range
 |
View all Cisco E3000 manuals
Add to My Manuals
Save this manual to your list of manuals |
Page 19 highlights
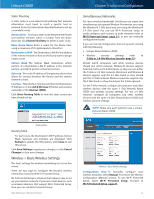
Linksys E3000 Size When Manual is selected in the MTU field, this option is enabled. Leave this value in the 1200 to 1500 range. The default size depends on the Internet Connection Type: •• DHCP, Static IP, or Telstra: 1500 •• PPPoE: 1492 •• PPTP or L2TP: 1460 Network Setup The Network Setup section configures the IP settings for your local network. Router Address This presents both the Router's IP Address and Subnet Mask, as seen by your network. Chapter 3: Advanced Configuration DHCP Reservation Click this button if you want to assign a fixed local IP address to a specific device on your network. This is helpful if you have a device you need to access at the same address all the time such as a media server or print server. You can reserve the IP address for the specific device by selecting it from the list of devices or by manually entering the MAC address of the device. DHCP Reservation You will see a list of DHCP clients with the following information: Client Name, Interface, IP Address, and MAC Address. Router IP Address IP Address This is the IP address of the router and is used as the base for all of your local network settings. Subnet Mask This is the subnet mask address for your router. It offers a selection of addresses from a drop-down menu. Most users will not need to change this setting. DHCP Server Settings The settings allow you to configure the Router's DHCP server function. The Router can be used as a DHCP server for your network. A DHCP server automatically assigns an IP address to each computer or device on your network. If you choose to enable the Router's DHCP server option, make sure there is no other DHCP server on your network. NOTE: If you choose to enable the DHCP server option, make sure there is no other DHCP server on your network. Network Address Server Settings (DHCP) DHCP Server DHCP is enabled by factory default. If you already have a DHCP server on your network, or you do not want a DHCP server, then select Disabled (no other DHCP features will be available). High Performance Wireless-N Router DHCP Reservation •• Select Clients from DHCP Table Click the Select check box to reserve a client's IP address. Then click Add Clients. Enter a Client Name and click Save Settings. •• Manually Add Client To manually assign an IP address, enter the client's name in the Enter Client Name field. Enter the IP address you want it to have in the Assign IP Address field. Enter its MAC address in the To This MAC Address field. Then click Add and click Save Settings. Clients Already Reserved A list of DHCP clients and their fixed local IP addresses will be displayed at the bottom of the screen. If you want to remove a client from this list, click Remove. Click Save Settings to apply your changes, or click Cancel Changes to clear your changes. To update the on-screen information, click Refresh. To exit this screen, click Close. Start IP Address The Start IP Address specifies the starting IP address for the range of addresses assigned by your Router when it functions as a DHCP server. (The first IP address assigned by the Router will be randomly selected within the range you specify.) Because the Router's default IP address is 192.168.1.1, the Start IP Address must be 192.168.1.2 or greater, but smaller than 192.168.1.254. The default Start IP Address is 192.168.1.100. 16
-
 1
1 -
2
-
3
-
4
-
5
-
6
-
7
-
8
-
9
-
10
-
11
-
12
-
13
-
 14
14 -
 15
15 -
 16
16 -
 17
17 -
 18
18 -
 19
19 -
 20
20 -
 21
21 -
 22
22 -
 23
23 -
 24
24 -
25
-
26
-
27
-
28
-
29
-
30
-
31
-
32
-
33
-
34
-
35
-
36
-
37
-
38
-
39
-
40
-
41
-
42
-
43
-
44
-
45
-
46
-
47
-
48
-
49
-
50
-
51
-
52
-
53
-
54
-
55
-
56
-
57
-
58
-
59
-
60
-
61
-
62
-
63
-
64
-
65
-
66
-
67
-
68
-
69
-
70
-
71
-
72
-
73
-
74
-
75
-
76
-
77
-
78
-
79
-
80
 |
 |
