Cisco PLE300 User Guide - Page 7
Back Panel of the Powerline AV 4-Port Network Adapter (model number: PLS300), Placement Options - configuration
 |
View all Cisco PLE300 manuals
Add to My Manuals
Save this manual to your list of manuals |
Page 7 highlights
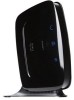
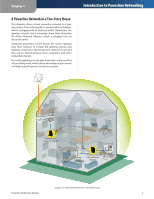
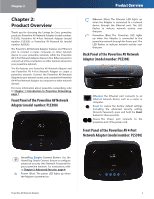
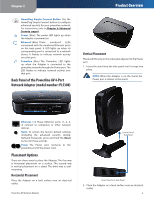
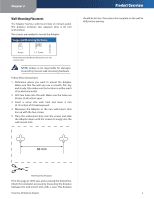
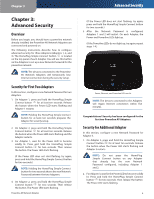
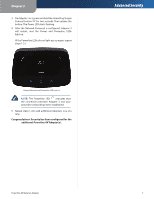
Chapter 2 HomePlug Simple Connect Button Use the HomePlug Simple Connect button to configure advanced security for your powerline network. For instructions, refer to Chapter 3: Advanced Security, page 6. Power (Blue) The power LED lights up when the Adapter is powered on. Ethernet (Blue) These numbered LEDs correspond with the numbered Ethernet ports on the back panel. A LED lights up when its corresponding port is connected to a network device. It flashes to indicate network activity over that port. Powerline (Blue) The Powerline LED lights up when the Adapter is connected to the powerline network through the Power port. The LED flashes to indicate network activity over that port. Back Panel of the Powerline AV 4-Port Network Adapter (model number: PLS300) Product Overview Vertical Placement The stand fits only on the side panel adjacent to the Power port. 1. Insert the stand into the side panel until it snaps into place. NOTE: When the Adapter is on the stand, the Power port is closest to the stand. Ethernet 1-4 These Ethernet ports (1, 2, 3, 4) connect to computers or other network devices. Reset To restore the factory default settings (including the advanced security setting, Network Password), press and hold the Reset button for three seconds. Power The Power port connects to the powerline end of the power cord. Placement Options There are three ways to place the Adapter. The first way is horizontal placement on a surface. The second way is vertical placement on a stand. The third way is wallmounting. Horizontal Placement Place the Adapter on a level surface near an electrical outlet. Powerline AV Network Adapter Fourth Slot of Side Panel Insert Stand into Side Panel 2. Place the Adapter on a level surface near an electrical outlet. 4
-
 1
1 -
 2
2 -
 3
3 -
 4
4 -
 5
5 -
 6
6 -
 7
7 -
 8
8 -
 9
9 -
 10
10 -
 11
11 -
 12
12 -
13
-
14
-
15
-
16
-
17
-
18
-
19
-
20
-
21
-
22
-
23
-
24
-
25
-
26
-
27
-
28
-
29
-
30
-
31
 |
 |
