Cisco PLE300 User Guide - Page 9
Advanced Security, Overview, Security for First Two Adapters - setup
 |
View all Cisco PLE300 manuals
Add to My Manuals
Save this manual to your list of manuals |
Page 9 highlights
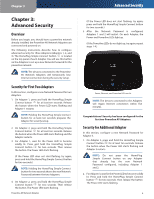
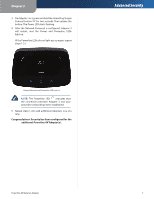
Chapter 3 Chapter 3: Advanced Security Overview Before you begin, you should have a powerline network already installed; the Powerline AV Network Adapters are connected and powered on. The following instructions describe how to configure advanced security for three Adapters (Adapters 1, 2, and 3). The HomePlug Simple Connect button is located on the top panel of each Adapter. You will use this button on the Adapters to set up a new Network Password for the powerline network. NOTE: The devices connected to the Powerline AV Network Adapters will temporarily lose Internet connection during the security setup. Security for First Two Adapters In this section, configure a new Network Password for two Adapters. 1. On Adapter 1, press and hold the HomePlug Simple Connect button for at least ten seconds. Release the button when the Power LED starts flashing and Adapter 1 restarts. NOTE: Holding the HomePlug Simple Connect button for at least ten seconds prepares the Adapter for security setup. 2. On Adapter 2, press and hold the HomePlug Simple Connect button for at least ten seconds. Release the button when the Power LED starts flashing and the Adapter restarts. 3. For Adapter 1, wait for the Power LED to become solidly lit. Press and hold the HomePlug Simple Connect button for two seconds. Then release the button. The Power LED starts flashing. (If the Power LED does not start flashing, try again; press and hold the HomePlug Simple Connect button for two seconds.) NOTE: Holding the HomePlug Simple Connect button for two seconds shares the new Network Password between the two Adapters. 4. On Adapter 2, press and hold the HomePlug Simple Connect button for two seconds. Then release the button. The Power LED starts flashing. Powerline AV Network Adapter Advanced Security (If the Power LED does not start flashing, try again; press and hold the HomePlug Simple Connect button for two seconds.) 5. After the Network Password is configured, Adapters 1 and 2 will restart. On each Adapter, the Power and Powerline LEDs light up. (If the Powerline LEDs do not light up, try again; repeat steps 1-4.) Power, Ethernet, and Powerline LEDs are Lit NOTE: The devices connected to the Adapters will regain Internet connection within five minutes. Congratulations! Security has been configured for the first two Powerline AV Adapters. Security for Additional Adapter In this section, configure a new Network Password for Adapter 3. 1. On Adapter 3, press and hold the HomePlug Simple Connect button for at least ten seconds. Release the button when the Power LED starts flashing and Adapter 3 restarts. NOTE: Do not press the HomePlug Simple Connect button on any Adapter that already has the new Network Password configured, including Adapter 1 and 2. 2. For Adapter 3, wait for the Power LED to become solidly lit. Press and hold the HomePlug Simple Connect button for two seconds. Then release the button. The Power LED starts flashing. 6
-
 1
1 -
2
-
3
-
 4
4 -
 5
5 -
 6
6 -
 7
7 -
 8
8 -
 9
9 -
 10
10 -
 11
11 -
 12
12 -
 13
13 -
 14
14 -
15
-
16
-
17
-
18
-
19
-
20
-
21
-
22
-
23
-
24
-
25
-
26
-
27
-
28
-
29
-
30
-
31
 |
 |