Cobra Road Scout Road Scout Manual - Page 13
Camera
 |
View all Cobra Road Scout manuals
Add to My Manuals
Save this manual to your list of manuals |
Page 13 highlights
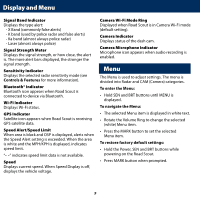
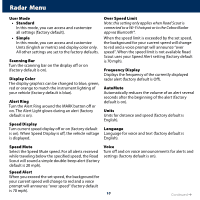
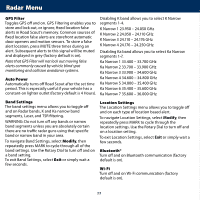
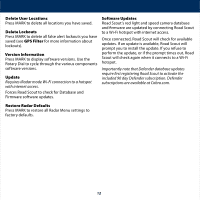
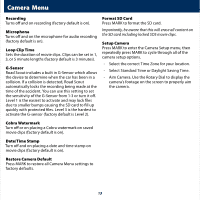
Camera Menu Recording Turns off and on recording (factory default is on). Microphone Turns off and on the microphone for audio recording (factory default is on). Loop Clip Time Sets the duration of movie clips. Clips can be set in 1, 3, or 5 minute lengths (factory default is 3 minutes). G-Sensor Road Scout includes a built in G-Sensor which allows the device to determine when the car has been in a collision. If a collision is detected, Road Scout automatically locks the recording being made at the time of the accident. You can use this setting to set the sensitivity of the G-Sensor from 1-3 or turn it off. Level 1 is the easiest to activate and may lock files due to smaller bumps causing the SD card to fill up quickly with protected files. Level 3 is the hardest to activate the G-sensor (factory default is Level 2). Format SD Card Press MARK to format the SD card. Importantly, be aware that this will erase all content on the SD card including locked SOS movie clips. Setup Camera Press MARK to enter the Camera Setup menu, then repeatedly press MARK to cycle through all of the camera setup options. - Select the correct Time Zone for your location. - Select Standard Time or Daylight Saving Time. - Aim Camera. Use the Rotary Dial to display the camera's footage on the screen to properly aim the camera. Cobra Watermark Turn off or on placing a Cobra watermark on saved movie clips (factory default is on). Date/Time Stamp Turn off and on placing a date and time stamp on movie clips (factory default is on). Restore Camera Default Press MARK to restore all Camera Menu settings to factory defaults. 13
-
 1
1 -
2
-
3
-
4
-
5
-
6
-
7
-
 8
8 -
 9
9 -
 10
10 -
 11
11 -
 12
12 -
 13
13 -
 14
14 -
 15
15 -
 16
16 -
 17
17 -
 18
18
 |
 |