Coby DTV 102 User Manual - Page 18
Reference - atsc digital converter box
 |
UPC - 716829971024
View all Coby DTV 102 manuals
Add to My Manuals
Save this manual to your list of manuals |
Page 18 highlights
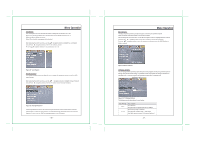
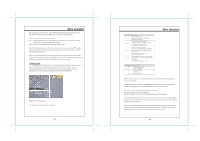
Reference This chapter discusses ways to troubleshoot the DTV-102 converter box and provides the module specifications. 5.1 Troubleshooting Guide If you are experiencing problems with the DTV-102, see Table 1 for available solutions. Table 1. DTV-102 Module Troubleshooting S ymptom S olution No power Make s ure the power s upply is s ecurely plugged into a s tandard wall outlet and the cord is plugged into the power connector on the C B module. Make s ure the C B module is turned on us ing the front panel power button or the remote control power button. C B is not res ponding to the remote control Make s ure to point the remote control directly at the remote control sensor on the C B , with no obs tacles in between them. Y ou may be too far from C B . T ry moving clos er. Make s ure that the remote control batteries are ins talled in the correct direction (+ and -). T he batteries may be depleted. T ry replacing them with new ones. V erify C B is operating correctly by pres s ing buttons on the front panel of C B . No picture Make s ure that the antenna in cable is correctly connected to the C B . Make s ure that the video out cable is correctly connected to the C B and T V . Make s ure that the C B and T V are turned on. Make s ure that the T V is correctly s et to the s elected C B video output channel. R efer to the T V owner's manual for further information. C heck the antenna and the antenna cable. T here may be damage or interference s ources . C heck the antenna and the antenna cable. T here may be damage or interference s ources . P icture is blocky or not clear R epos ition the antenna to improve s ignal s trength. S ignal s trength can als o be affected by rain or s now. In the US A, the webs ite www.antennaweb.org can provide help in determining the bes t antenna orientation. No s ound Make s ure that the audio cables are correctly connected between the C B audio outputs and the T V audio inputs . Make s ure that C B and T V are turned on. Make s ure the C B and T V volume s ettings are at a reas onable level. Make s ure that the MUT E function is not activated on the C B or T V . Make s ure the T V is correctly s et to the s elected C B audio output channel. W hen T V has only one audio input jack, use a standard audio cable (white) to connect the audio output jack (white) on the C B to the audio input jack on the T V . T he red audio cable and the C B red audio output jack are not needed. - 32 - Reference All digital channels are not received C C dis play s tays on or two s ets of captions are s hown F orgot the P IN for V -C hip Make s ure that the Auto P rogram proces s in the C hannel menu has been completed. It will be required when you s etup the C B for the firs t time or when the C B is moved to a location where other channels are broadcas t. T he s elected channel does not exis t at the time. T here are not always s ub-channels being broadcas t. W hen the Auto P rogram proces s is interrupted and not completed, s ome channels will not be received. Make s ure to complete the Auto P rogram proces s in the C hannel menu. Make s ure the C B C C mode is s et to Off. Make s ure that the T V 's C C dis play is turned off. R efer to the T V owner's manual for further information on how to turn off its C C feature. Unplug the AC power cord and wait for approx. 5 s econds , then plug in the power cord. In the V -C hip menu, enter the default number "0000." 5.2 Specifications Product Converter Box for ATSC to NTSC Connecting Jacks ANT IN F connector (75 ohm) ANT OUT F connector (75 ohm) Video Output 1-pin RCA jack, 1Vpp, 480i composite Analog Audio Output 2-pin RCA jack (L, R), 450 mVrms (100k ohm) RF Input DTV standard ATSC Channel Coverage Terrestrial: 2-69 Power Source 100-240 VAC, 50/60 Hz +/-0.5 % Power Consumption w/o smart antenna, 8W (Power on), Operating Condition 41 F° (5 C°) - 104 F° (40 C°) Board Dimensions (241 mm x 168 mm x 43 mm) Weight 425g Accessories Remote Control 1 (Provided) Batteries (size AAA) 2 (Provided) RF cable 1 RCA cable (Video+Audio L/R) 1 Designs and Specifications are subject to change without notice. - 33 -
-
 1
1 -
2
-
3
-
4
-
5
-
6
-
7
-
8
-
9
-
10
-
11
-
12
-
 13
13 -
 14
14 -
 15
15 -
 16
16 -
 17
17 -
 18
18
 |
 |