Compaq Pro 6305 Hardware Reference Guide - Page 87
Secured Workstation,
 |
View all Compaq Pro 6305 manuals
Add to My Manuals
Save this manual to your list of manuals |
Page 87 highlights
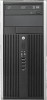
7. Insert the plug end of the security cable into the lock (1) and push the button in (2) to engage the lock. Use the key provided to disengage the lock. Figure 3-48 Engaging the Lock 8. When complete, all devices in your workstation will be secured. Figure 3-49 Secured Workstation Installing a Security Lock 79
-
 1
1 -
2
-
3
-
4
-
5
-
6
-
7
-
8
-
9
-
10
-
11
-
12
-
13
-
14
-
15
-
16
-
17
-
18
-
19
-
20
-
21
-
22
-
23
-
24
-
25
-
26
-
27
-
28
-
29
-
30
-
31
-
32
-
33
-
34
-
35
-
36
-
37
-
38
-
39
-
40
-
41
-
42
-
43
-
44
-
45
-
46
-
47
-
48
-
49
-
50
-
51
-
52
-
53
-
54
-
55
-
56
-
57
-
58
-
59
-
60
-
61
-
62
-
63
-
64
-
65
-
66
-
67
-
68
-
69
-
70
-
71
-
72
-
73
-
74
-
75
-
76
-
77
-
78
-
79
-
80
-
81
-
 82
82 -
 83
83 -
 84
84 -
 85
85 -
 86
86 -
 87
87 -
 88
88 -
 89
89 -
 90
90 -
 91
91 -
 92
92 -
93
-
94
-
95
-
96
-
97
-
98
-
99
-
100
-
101
-
102
-
103
-
104
-
105
 |
 |

7.
Insert the plug end of the security cable into the lock (1) and push the button in (2) to engage the
lock. Use the key provided to disengage the lock.
Figure 3-48
Engaging the Lock
8.
When complete, all devices in your workstation will be secured.
Figure 3-49
Secured Workstation
Installing a Security Lock
79