Craftsman 21400 Owners Manual - Page 5
thehexsocket - saw
 |
View all Craftsman 21400 manuals
Add to My Manuals
Save this manual to your list of manuals |
Page 5 highlights
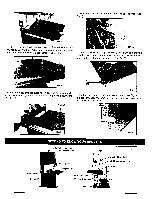
d. Placethebladetensioknnobonto thebladetensione(rSee Fig.4). b. Fastetnheguiderailwithtwoeachstarknobscrewandwasher FIG, 4 tothetableU. sethehexsockehteadcapscreww, ashearndwing nutforcorrectinthgeworkintgableflatness(S. eeFig.2) e. To ensure sufficient upright stability of the machine it should be bolted to floor, bench or worktable. For this purpose 6mm holes are provided in the machine's base. (See Fig. 5) FIG. 2 c. Lay the rip fence onto the guide rail. Adjust the rip fence parallel to the saw blade. Tighten rip fence handle by pressing downward. (See Fig. 3) FIG. 5 f. The bandsaw has a 2-1/2" dust port included. (Sea Fig. 6) It is recommended that when in use, the bandsaw is connected to a suitable dust collector. Look !" FIG. 6 tension knob =g knob ]uide T _. _ _Blade rack ng knob 'Guide post adjusting knob , Lower tabl Dust
-
 1
1 -
 2
2 -
 3
3 -
 4
4 -
 5
5 -
 6
6 -
 7
7 -
 8
8 -
 9
9 -
 10
10 -
 11
11 -
12
-
13
-
14
-
15
-
16
-
17
-
18
-
19
-
20
 |
 |
