Craftsman 21400 Owners Manual - Page 6
Centering, Table, Setting, Square, Blade, Adjusting, Fence, Changing, Adjusting - bandsaw blade guide operation
 |
View all Craftsman 21400 manuals
Add to My Manuals
Save this manual to your list of manuals |
Page 6 highlights
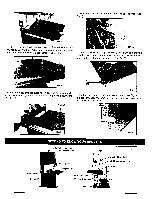
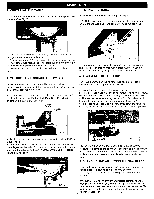
1. CENTERING THE TABLE a. Loosen the four hex.,bolts mounting the table to the upper table trunnion. (See Fig. 7) 3. TILTING THE TABLE For bevel cuts, the table tilts 0 through 45 degrees. a. To tilt the table, loosen the wing nut on the table trunnion, set the table to the required angle and tighten the wing nut again (See Fig. 10). FIG, 7 b, Move the table sideways as required, until the saw blade runs through the center of the table insert. c. ft the adjustment of "b" is not enough to center the table, loosen !he four flange nuts holding the lower table trunnion and move the tabie sideways to place the table in the center. d. Re-tighten hex. bolts for trunnion, recheck the saw blade position. 2. SETTING TABLE SQUARE TO SAW BLADE Loosen the wing nut on the lower table trunnion and place a suitably sized square against the saw blade. If the table requires adjustment, proceed as follows: a. Using a wrench, release the hex. nut on the frame. (See Fig.8) b. Place the wrench on the hex. bolt and adjust until the table square to the saw blade.(See Fig.8) FIG. 10 b. It is recommended to verify the correct angle setting using an angle guide, or by making trial cuts in scrap wood. Adjust the indicator accordingly by using a phillips head screwdriver. 4. ADJUSTING THE RIP FENCE The locking pressure of the rip fence has been factory-set, if adjustment is required proceed as follows: a. Raise the fence handle to horizontal position. b. Turn the fence handle clockwise to increase clamping pressure, counterclockwise to decrease clamping pressure.(See Fig. 11) c. After counterclockwise truning the fence handle, sliding the rip fence to the desired position on the guide raiL(See Fig. 11) d. The fence handle has a cam action, press down the handle to stamp tightly to the table after setting rip fence to desired position. FIG. 8 c. Tighten the hex. nut and recheck the saw blade and the table for squareness. d. Lock the table into position and check that the indicator reads zero degree on the side of lower table trunnion. Loosen the screw securing the indicator and reset if necessary to give zero degree reading. (See Fig. 9) I FIG. lt NOTE: Do not adjust the fence handle such that excessive pressure is exerted during operation - this may lead to deformation of the end clamp at the rear of the rip fence. Set the fence handle to apply just enough pressure to enable safe operation during cutting. 5. CHANGING AND ADJUSTING THE SAW BLADE This bandsaw is factory-equipped with a general-purpose wood cutting blade, the saw blade is set prior to delivery. To change the saw blade, the following procedure must be followed: WARNING: To avoid injury from unexpected starting, whenever changing the saw blade or carrying out adjustments, switch the handsaw off and remove the power cord from the main outlet. To avoid injury to hands when handling the saw blade, wear gloves whenever necessary. 6
-
 1
1 -
 2
2 -
 3
3 -
 4
4 -
 5
5 -
 6
6 -
 7
7 -
 8
8 -
 9
9 -
 10
10 -
 11
11 -
 12
12 -
13
-
14
-
15
-
16
-
17
-
18
-
19
-
20
 |
 |
