Craftsman 21513 Operation Manual - Page 8
Adjusting, Disc Table, Angle, Cleaning
 |
View all Craftsman 21513 manuals
Add to My Manuals
Save this manual to your list of manuals |
Page 8 highlights
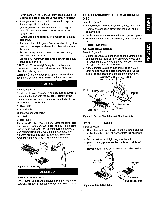
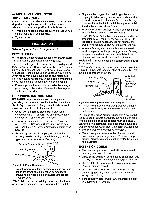
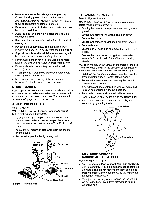
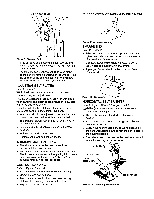
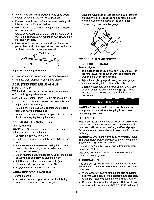
• A work stop with nut is provided to be used when straight sanding in the horizontal position. • Remove socket head bolt and washers holding belt table on sander. Remove belt table. • Mount work stop to sander using the socket head bolt and washers. • Use a combination square to adjust the work stop at 90 ° to the belt with a '/,8" maximum gap between the belt and work stop. • Use the work stop to position and stabilize workpiece. Keep end butted against work stop and move workpiece evenly across abrasive belt. • Move the workpiece across the down side (right) of the abrasive disc. The abrasive disc moves fastest and removes more material at the outer edge. • For accuracy, use the miter gauge. Figure 13 - Attaching Work Stop • Use extra caution when finishing very thin pieces. • Remove work stop for finishing long pieces. ADJUSTING DISC TABLE ANGLE Refer to Figure 2. WARNING: Disconnect sander from power source before making any adjustments. Disc table is adjustable from 0 to 45 ° for beveled work. • To adjust the disc table, loosen the two knobs and adjust to the desired angle. • Use the scale on disc table trunnions to set table from 0 to 45 ° to abrasive disc. • When disc table is at desired angle, lock it into position by securely tightening the knobs. REPLACING ABRASIVE DISC Refer to Figure 2. WARNING; Disconnect sander from power source before making any adjustments. • Loosen and remove two knobs. • Gently press down on disc table and slide out disc table. • Remove old abrasive disc by peeling it from alu- minum disc. Removing aluminum disc from motor shaft is not necessary. • Clean aluminum disc if necessary. Select the proper abrasive disc and apply to aluminum disc. • Additional abrasive discs are available (see Recommended Accessories, page 13). • Replace disc table and tighten knobs. ABRASIVE DISC FINISHING Refer to Figure 14. • Abrasive disc sanding is well suited for finishing small flat surfaces and convex edges. Figure 14 - Abrasive Disc Finishing USING MITER GAUGE Refer to Figure 15. • The miter gauge is used only on the disc table. Use the miter gauge for securing work and holding the proper angle while disc sanding. • Adjust the angle by repositioning the miter gauge scale and locking it into place with knob. • Check the accuracy of the miter gauge. Use a combination square to adjust the miter gauge square to the disc. Loosen screw and reposition indicator if necessary. WARNING: Make certain that unit is disconnected from power source before attempting to service or remove any component. CLEANING Keep machine and workshop clean. Do not allow sawdust to accumulate on the tool. Keep wheels clean. Dirt on wheels will cause poor tracking and belt slippage. Operate tool with dust collector to keep dust from accumulating. WARNING: After sanding wood or nonmetallic material, always clean area of sawdust before grinding metal. Sparks could ignite debris and cause a fire. Be certain motor is kept clean and is frequently vacuumed free of dust. Use soap and water to clean painted parts, rubber parts and plastic guards. LUBRICATION The shielded ball bearings in this sander are permanently lubricated at the factory. They require no further lubrication, • When operation seems stiff, a light coat of automo- bile-type wax applied to the belt table and disc table will make it easier to feed the work while finishing. • Do not apply wax to the belt platen. Belt could pick up wax and deposit it on wheels causing belt to slip. 8
-
 1
1 -
2
-
 3
3 -
 4
4 -
 5
5 -
 6
6 -
 7
7 -
 8
8 -
 9
9 -
 10
10 -
 11
11 -
 12
12 -
 13
13 -
14
-
15
-
16
-
17
-
18
-
19
-
20
-
21
-
22
-
23
-
24
 |
 |
