Craftsman 27675 Operation Manual - Page 17
VARIABLESPEEDSWITCH, seeFig.7, thecorrect, speeds, tosandpaper, gritsandvarioussurfacesand,
 |
View all Craftsman 27675 manuals
Add to My Manuals
Save this manual to your list of manuals |
Page 17 highlights
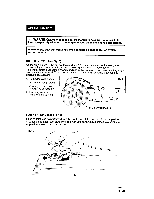
VARIABLESPEEDSWITCH(seeFig.7) Thevariablespeeddialallowsmatchingthecorrect speedsto sandpapegrritsandvarioussurfacesand materialsbeingsandedfor either fast material removal or a fine smooth finish. Rotate the dial from 1 to 6, with 1 being the lowest speed and 6 the highest speed. APPLICATIONS Only use your sander for the applications listed below. • Sanding wood surfaces with various grits of sandpaper, • Removing rust from steel surfaces with special sandpaper. Fig. 7 I m_aWgnAeRsiNumINsGu:rfaces.DDueOtoNOthTe duasengfoer wofeftirsea,nDdOingN. OT use your sander to sand { be_WthAroRwNnINtoGw:ards AthLeWoApYeSractloarm, pcatuhseinwgorskepriieocues. iAnjnmu'yn.secured workpiece could to covCeAr UthTeIOaiNr v:entWs hwenithgyriopuprinhganthdes s(saenedeFrigd.u8r)i.ng use, ALWAYS be careful not Air Vents Fig. 8 USING YOUR SANDER (see Fig. 8) 1. ALWAYS clamp and secure the workpiece to prevent i1f:rom moving under sander. 2. Place sander on workpiece so that all of sanding disc sud:ace is in contact with workpiece. 3. Start the sander and move it slowly over workpiece, making :successivepasses in parallel lines, circles, or crosswise movements. . Upon completion of sanding operation, turn sander off and wait until sanding disc comes to a complete stop before removing from workpiece. 5. Extended periods of sanding may tend to overheat the motor. If this occurs, turn sander off and wait until sanding disc comes to a complete stop, tl_en remove it from workpiece. Remove sanding disc, then turn sander on and run it free without a load (off the workpiece) to cool the motor. 17 27675 2/11/08
-
 1
1 -
2
-
3
-
4
-
5
-
6
-
7
-
8
-
9
-
10
-
11
-
 12
12 -
 13
13 -
 14
14 -
 15
15 -
 16
16 -
 17
17 -
 18
18 -
 19
19 -
 20
20 -
 21
21 -
 22
22 -
23
-
24
-
25
-
26
-
27
-
28
-
29
-
30
-
31
-
32
-
33
-
34
-
35
-
36
-
37
-
38
-
39
-
40
-
41
-
42
-
43
-
44
-
45
-
46
-
47
-
48
-
49
-
50
-
51
 |
 |
